
DBC: Chili - Tips and Tricks
Variable Naming Convention
When naming variables in the Name field in Chili Backoffice, avoid using spaces. For example, an address input field should be named addressinput or address_input .
Because Chili is embedded within the DB Commerce platform, spaces in variable names can cause issues on the user-facing side. Following this convention helps ensure variables are passed and interpreted correctly between the two platforms.
The Display Name field, however, can contain spaces — this is the end user-facing label shown on the site and is not affected by the same restrictions.

Copying Variables from One Document to Another
- In Chili Backoffice select the document you want to copy variables to
-
By clicking your Chili Document once, you open a panel of options to the right:
General / URL Builder / Info / Variables / Annotations / Document Event Actions
- Click Variables
-
Under Variables, click the button “Import From Doc”

-
This will open the following pop up window
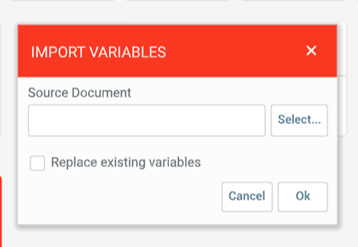
- Click “Select”
- From the items directory, select the document you want to copy from(This is the Source Document and will show in the Source Document field once selected)
- Click “Ok”
- Open the document you copied the variables to, under the Variable Data tab you should now see the copied variables


Exporting a Chili Document
- Open your Chili Document
-
On the left navigation open, select Output > Package Output
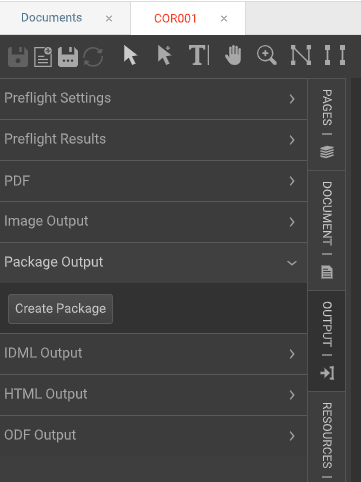
- Click "Create Package"
- Chili will create a zipped package for you, named based on your Chili Document and save it within your Downloads
- Within this zip file you will have Assets, Fonts, and the .xml files associated with the document

Importing a Chili Package
- Go to Resources within Chili Backoffice
- Select Documents
- Select Items
- Click Add New
- Within the Create New Modal, under "Type" select Chili Package

- Select "Browse" to upload your Chili package. Once uploaded the name will be prefilled with the name of the zipped file. You can change as desired.
- Within the Asset and Font Locations, you can enter the directory location in which you want to upload the files or you can select "Browse" to navigate to the directory.
- Once completed, click "Add"
- Based on the size of the file, this make take a few seconds to upload.
Bleeds
When saving a file from InDesign the program will account for the offset and size of the bleed marks. CHILI unfortunately, does not work this way. If the bleed marks are 0.125” long and sitting 0.125” off the edge of the template then we’re looking at a total of 0.25” to the outside point of the bleed mark. We set the template to use 0.5” to extend far enough to encompass the bleed marks. If the template was set for 0.4” bleed the crops would be seen, but they would be cut off by 0.1”.

Layers
It is good practice to begin all Chili Documents with the following three layers:
Locked: Elements that the user cannot do anything with, for example background art
Variable: Elements that the user can enter, but can’t modify placement on the template
Editable: Elements that can be edited by end user


Suppressing a Layer for Printing
- On the Document Tab, expand the Layer List
- Click the "Pencil" icon for the Locked Layer (if this is the layer you wish to suppress)
- A modal will appear named "New Layer Settings"
-
Uncheck the box "Include in Output"
This will allow the low res proof for the user to still see the "full" proof, but the vendor will not receive the Locked Layer in their output.

- Save your document

Tabs
How to create a tab, for example aligning phone numbers vertically when phone leaders are different lengths.
-
Make sure the Toggle View Mode is off.
When Toggle View Mode is off, you will see the bleeds around your document.

- Select Frame
- Click Toggle Source assuming “Contains Variables” is checked for the frame
- Place curser between two variablesExample Phone1_Leader Phone1
- You will see a ruler at the top of the frame
- Click in the ruler to create a tab
- Move the arrow where tab is needed
- Click the arrow to get a pop up to set the X value if needed
- Click within frame to close tab window
- Click X in pop up window to remove tab


Enabling Crop on Image Frame
- Load Environment Default No Panels
-
Copy this Environment and name Default No Panels wToolbar
(You may want a second Environment so items that use the crop will show the tool bar in the editor while your other items won't. The toolbar will show as blank until clicked. You could apply these updates to Default No Panels, it’s just preference. DB Demo Env we just applied to Default No Panels and a blank toolbar appears on items.)
-
In the top toolbar, find the Pencil Icon for the toolbar named ImageFrameToolBarBox
If you can’t find it here, click the last pencil icon that brings up all the Properties > Edit Image Settings
-
You will get the following modal

-
Make the following setting changes:
Users: All
Flip Image: Yes
Change Fit: Yes
Fit Popup: Yes
Always Show Crop: Yes
Progressive Previews: Yes
All other options should be set to No
- Save the changes to the copied Environment Default No Panels wToolbar
- Next click the image frame you want to crop
- Go to the tab Frame>Frame Constraints
-
For the option Lock Content, set to No

- Save Document
- It's also worth noting that the frame won't have these options at all until an actual image is in the frame, so if you are just using a placeholder box, you will need to add an image in order to simulate the End User view from Backoffice.


Enabling Image Upload: Images Stored in Chili Backoffice
- Upload the images you wish for users to select from within Chili Backoffice
- Open your Chili Template
- Create a new variable and set the "Type" as Image
- Select the Type Specific Tab
- Select the Popup Properties button
- A modal named Properties will appear
-
In the value Browse Dir. enter the directory for the images you wish the end user to select from
Example: 00-DBDEMB00\COR004-ImageOptions
- Save
- Go to your Dist Admin
- Select Items
- Select Company and search for item
- Go to the Template Tab
- Go to the Chili Variables section
- Double click your image variable
- A modal will appear for for the Image Types option, select "Chili Assets"
- When the user customizes the item, they will only see the images within the specified folder to select from
Enabling Image Upload: User Uploaded Files
- Open your Chili Template
- Create a new variable and set the "Type" as Image
- Select the Type Specific Tab
- Select the Popup Properties button
- A modal named Properties will appear
-
In the value Browse Dir. enter the value %user%
This is telling Chili the document will be looking for a user uploaded file
- Save
- Go to your Dist Admin
- Select Items
- Select Company and search for item
- Go to the Template Tab
- Reset User Temp file if a change was made to the template
- Go to the Chili Variables section
- Double click your image variable
- A modal will appear for for the Image Types option, select "My Images"
- When the user customizes the item, they will see a modal to upload an image
Anchor Icons to Text Variables
Part 1: Set up the text frame and variables
-
Open the Variables panel and create one Short Text variable for each social media platform (for example: Facebook, Instagram, Twitter, LinkedIn).
-
In Edit Story mode, populate the text frame with the four variables, placing each on its own line.
-
For each variable line, ensure the Remove Paragraph if Variable is Empty checkbox is checked. This setting causes the remaining lines to move up automatically when a URL value is removed.
Part 2: Tag the text frame paragraphs
-
While still in Edit Story mode, switch to Edit with Formatting mode.
-
Select the first line of text (the Facebook URL line). In the Text tab, go to Paragraph Settings and assign a unique tag — for example, fb.
-
Repeat for each remaining line, assigning a distinct tag to each paragraph (for example: insta, twitter, ln).
-
Also assign a tag to the entire text frame itself (for example: social). You will need this frame-level tag when configuring the anchor targets.
Part 3: Create a separate layer for each icon
-
Create a dedicated layer for each social media icon (for example: a Facebook layer, an Instagram layer, a Twitter layer, and a LinkedIn layer).
-
Place each icon image in its own image frame within its respective layer. Keeping icons on separate layers makes it possible to show or hide each one independently.
Part 4: Anchor each icon to its corresponding text paragraph
-
Click on the Facebook icon frame. Go to Frame Settings and then the Anchor tab.
-
Set the anchor so that the bottom of the image frame targets the text within the social frame, specifically the paragraph tagged fb, with an offset of 0.
-
Repeat this anchoring process for each remaining icon, targeting its corresponding paragraph tag:
-
Instagram icon → target paragraph insta, bottom, offset 0
-
Twitter icon → target paragraph twitter, bottom, offset 0
-
LinkedIn icon → target paragraph ln, bottom, offset 0
-
Part 5: Write show/hide actions on each variable
-
Open the Facebook variable and navigate to the Actions section.
-
Add the following two-step action:
-
Step 1: Set the Facebook icon layer Visible to false (hidden by default).
-
Step 2: Add a condition — if the variable value is different from a blank field (i.e., it contains a value), set the Facebook icon layer Visible to true.
-
-
Repeat step 13–14 for each of the remaining three variables (Instagram, Twitter, LinkedIn), targeting each one's respective icon layer.