
DBC: Promo Item - Variants
Variants
This is where you define the variants and specific variant options that might apply to your product. This part of the promotional product configuration is one of the most crucial, the possible combinations of variants will inform how many unique item codes will be created in your back-office system.
Add Variant
A variant represents a category of possible permutations of a promotional product. Common examples of variants for a typical promotional product are Size and Color. Promo Items may consist of one or many variants, though keep in mind that for every variant added, each possible combination of Variant Options will represent a unique Item that can potentially be created, so variants should be created with caution (Promo items must contain at least one variant, even if just one option is available).
Upon adding a variant, you will be required to give it a name (e.g., Size) and select the Variant Type. You must also specify a enter a "Vendor Variant Code," which could be whatever terminology the vendor who produces the item uses to refer to the variant.
There is a checkbox to "Include Options in Item Creation." If this box is checked, the Variant Option will require an ITEM SKU that will be concatenated with the other strings of characters (Base Item Code + other Variant Item SKUs) to create the full Item Code. If unchecked, it will not be included as part of the Item Code and will not have the ability to have Cost/Sell Modifications.
Variant Types
Variant Types dictate how end users shopping for items with these variations view and interact with the item detail page and select the version of the item they wish to purchase. Possible Variant Types include:
-
Image: Users might convey possible variations of an item such as logo placement or embroidery style through use of “Large” or “Small” image thumbnails. It is recommended to pad images used here with 30 pixels on all sides, and to use files with a resolution of 72 dpi.
a. Small – Thumbnails displayed at 60px W x 37px H in rows of up to 6 before wrapping to a new row.

b. Large – Thumbnails displayed at 120px W x 75px H in rows of up to 3 before wrapping to a new row.

-
Swatch: The swatch variant type is recommended for showcasing different color or texture options, such as in the case of apparel items. When configuring individual variant options, administrators can choose between two different types of swatches.
a. Color swatches, which are driven by Hex Values (or HTML Color Names): If an option is comprised of multiple colors, a Duotone Swatch can be created by entering up to two Hex Values.
b. Image swatches, which are scaled versions of image files: Custom Image swatches might be considered as an alternative to the default square or “tile” swatch format. Files for custom image swatches should be 200 x 200 pixels, full bleed, with a resolution of 72 dpi.


-
Text: Perhaps the most basic variant type, when used, the display name of variant options will be shown to end customers in text form. There are two options here:
a. Labels
b. Dropdown Menu

The order in which variants are listed within the Variants tab under the Distributor Admin interface is the order in which they will display to end users when viewing the item detail page on the customer site. To manage the display order for items containing multiple variants, administrators can hover over a variant, click the widget that appears to the left of its header, and drag the variant above or below other the variants as desired.
Tip: When viewing the list of an item’s variants, administrators can expand or collapse the details of a given variant for ease of viewing. Below, the details and options of each variant have been collapsed so I can clearly see the order in which variants will be displayed to end users.

In this scenario, users are first prompted to confirm their selection for the variant Color, followed by Size, then finally, Restaurant.

Variant Options
Each version of a variant constitutes a Variant Option. For example, the variant “Size” might have variant options such as Small, Medium, Large, and Extra-Large.
Each variant option must have a display name that will appear to users upon selection when adding to cart, as well as an Item SKU. The Item SKU is important as this will be appended to the "Base Item Code" to suggest a unique Item Code that identifies the variant-specific version of an item.
For instance, for an apparel item with the Base Item Code “SHIRT”, the Item SKU “XL” might be used to create an Item Code of “SHIRTXL” for the item corresponding to the Extra-Large variation. As a best practice, these SKUs should be kept to one or two characters, because as options from different variants are combined, SKUs from each variant option will be appended to the Base Item Code to create an Item Code that represents each unique combination of options.
For example, if the Extra-Large Shirt also has a “Color” variant with the options red (“R”) and blue (“B”) available, the item code for the Extra Large, Red item would be “SHIRTXLR”. Administrators will have the opportunity to override the item codes that represent each permutation of variant options prior to formally creating those items in their back-office systems.
Administrators must also specify a “Vendor Option Code” to denote how a vendor refers to a given option. This Vendor Option Code will be appended to the "Vendor Base Item Code" to suggest a unique Vendor Item Code that identifies the variant-specific version of an item for that vendor.
You can optionally add a description that further differentiates an option from other available options, such as specific measurements. Descriptions specific to a variant option will be appended to the Base Item’s description when users select that option on the item detail page.
In the screenshot below, the user has selected the “XLarge” variant option, so the description containing measurements specific to that option has been appended to the Base Item’s description.

When configuring variant options, administrators may also apply Cost, Sell and Weight Modifications when applicable. End customers shopping for items on DB Commerce sites will only be privy to “Sell” prices, so if it is desired to pass some of those additional costs onto end customers, the way to do so would be to apply a Sell Modification.
For instance, if the “2XL” size option costs $1 more to produce than the Small-Large options, administrators could apply a "$1 Cost Modification," and a "$2 Sell Modification."
Modifications may be applied either as a flat amount, or in terms of a percentage, and may be either positive or negative. "Negative Sell Modifications" offer a convenient way for administrators to offer discounts to customers for options that have gone on sale, been discontinued, or otherwise reduced in price.
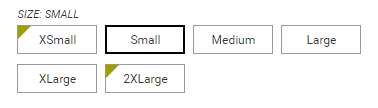
If a Sell Modification exists for an option, end customers will see a green marker in the upper left corner of that option’s selection box on the item detail page. Upon hovering over that option, users will see the amount of the modification.

For cases in which sell modifications are used and thus many potential prices exist, pricing will be displayed to end users as a range. As users make precise variant selections (or options are preselected), this range will be reduced or narrowed down to a single price.

If a particular option adds to (or detracts from) the overall weight of the item to the point that shipping costs might vary, administrators can apply a Weight Modification to that variant option.
Reminder: Weight is measured in pounds.

Each variant within a Base Item may have up to one variant option designated as the Preselected Option. Setting an option as the preselected option when another option within that variant already has this designation will remove the flag from the current option.
If multiple variants have preselected options, the specific combination of preselected options will be presented to end users on the item detail page. In the example below, Grass and Butchery have been configured to be preselected options for the Color and Restaurant variants, respectively.
As such, these selections are highlighted when users arrive on the item detail page, and images specific to this variant combination are brought to the forefront.

Tip: When configuring many different options, we recommend utilizing the “Add Another Option” feature for a continuous setup experience and to minimize clicks, as opposed to Closing and saving each option individually.

Batch Ordering
Our batch ordering interface offers a simple way for customers to add multiple quantities of different variant combinations to their cart at once. Using the example of an apparel item with both size and color variations, administrators can create a grid, where end users can simply enter the number of units of each combination, they wish to purchase within the context of a single Base Item view.
For the polo shirt below, a batch ordering grid shows color possibilities along the horizontal axis, and size variant options along the vertical axis. In this case, the user is simultaneously adding 1 “XSmall” / “Charcoal” shirt, 2 “Small” / “Berry” shirts, 3 “Medium” / “White” shirts, 4 “Large / ”Poppy” shirts, and 5 “XLarge”/ “Atoll” shirts to their shopping cart.

As users enter and edit quantities into a Batch Ordering grid, a running summary of what they’re attempting to add to the cart, including the total price for each variant combination, and a subtotal cumulative of all combinations is displayed.

Tip: This can be used in conjunction with Volume Pricing to alert users to potential savings that might be available as a result of ordering in a larger quantity.
Batch Ordering can be used for either one or two variants within a single Base Item. Once variants have been setup, administrators can enable Batch Ordering for the item as a whole under Promo Items > Variants.

If enabled, administrators can select which variants should appear along the vertical and horizontal axes of the Batch Ordering grid. For simpler items where there is only one variant, administrators can specify a variant for just one axis. In the mug below, the only variant is Color, but users still can add different options to their cart at once through a single item detail view.

While only one Batch Ordering grid may be setup for a single Base Item, this can be used in conjunction with other variant selections. In the case of the polo shirt below, a Batch Ordering grid was used so users could quickly specify their desired Size and Color combinations, however, users must also specify a logo variant that before adding items to their cart.
In this scenario, users will be prompted to select their preferred Logo style in tandem with entering quantities into the Batch Ordering grid. If a user wishes to order variations of each logo style, they can select each style, add quantities to their cart, and repeat the process with the other styles.

Reminder: If the Batch Ordering feature has been enabled for an item, a suggested order quantity may not be used.
Copy Variant
There is an option to copy an existing variant. The admin will select the Copy Variant button and be prompted to select the promo item to copy from.

Once the item is selected, they will be prompted to select the variant they choose to copy.

Once selected and ok is clicked, the variant and all its data will copy into the open promo item. From there, you can customize for this particular item as needed.