
EQD: Setting up an ODBC Connection to the EQD PSQL/Actian Zen Database
Be advised:
- If you're using the Azure hosted version of the EQ Distributor software, you won't be able to set up an ODBC connection. Hosted clients do not have direct access to the SQL database. This article applies only to users who host their own EQD data.
- Troubleshooting ODBC connection issues is outside the scope of DemandBridge support. Any troubleshooting related to ODBC is the responsibility of the client.
- This article is based off Pervasive.SQL versions 9.1–9.5. These steps may differ with other versions.
- This guide only explains how to create the connection. It doesn’t cover using the ODBC connection in other applications.
Overview
To create the ODBC connection, you’ll need to:
- Copy the DDF files
- Set up the server connection
- Set up the client (workstation) connection
Step 1: Copy the DDF Files
Copy the following five files from the Q2000\Reports folder on the server to your company folder (typically named 0001 ):
- Comment.ddf
- Field.ddf
- Fieldext.ddf
- File.ddf
- Index.ddf
Step 2: Create the Server (Engine) Connection
Complete these steps on the server where Pervasive is installed.
-
Open Pervasive.SQL Control Center: Start > All Programs > Pervasive > Pervasive.SQL > Pervasive.SQL 9 Control Center

-
Expand the server name and then expand Databases

-
Right-click Databases > New > Database

- Configure the new database:
- Database Name: QUANTUM2K
- Browse to the company folder (e.g., 0001)
- Uncheck: Bound and Create dictionary files
- Check: Create DSN
- Open Mode: Normal
- Click Finish.
- Right-click QUANTUM2K > Properties
-
In the Directories section, click New

-
Set the Data file path to the
Q2000\Tempfolder
- Click OK and close the Properties and Control Center windows.


Step 3: Create the Client (Workstation) Connection
Perform these steps on each workstation that needs access.
-
Open Control Panel > Administrative Tools > Data Sources (ODBC)

- Select the System DSN tab and click Add
-
Select Pervasive ODBC Client Interface and click Finish

- Configure the data source:
- Data Source Name: Q2K
- Server: Enter the server name or IP where Q2000 is located
- Click Get DSN List
- Select QUANTUM2K from the dropdown
-
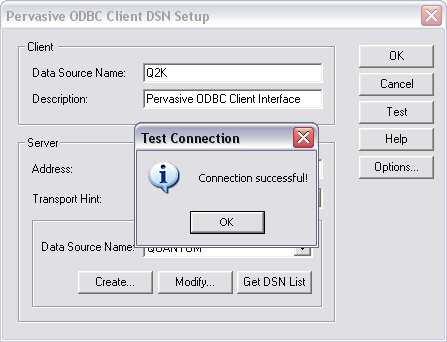
-
Click Test — you should see "Connection Successful"

- Click OK to finish setup.


Finished!
The ODBC connection is now configured and ready to use.