
EQD: Report Scheduler
Auto Scheduler Guide
Introduction
e-Quantum’s Auto Scheduler is used to automate recurring tasks such as imports, exports, and reports. It includes:
- Scheduler Configuration (within e-Quantum)
- Auto Scheduler Engine (a separate desktop application)
⚠️ The Auto Scheduler should run continuously (24/7), only pausing for backups during a configured "sleep" period.
Installation Overview
1. Download Keys
- Log into e-Quantum as Supervisor.
- Go to:
File > Utilities > Install/Update > Install Modules - Click Download, then Exit.
-
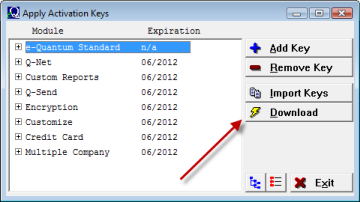
- Restart e-Quantum when prompted.
2. Install the Auto Scheduler Engine
- On the server or dedicated PC, go to:
Q2000 > WSFAX - Run
SETUP.EXEto install the engine and place a shortcut on the desktop.
3. Configure Email Settings
- Go to:
Q-Net > Q-Net Maintenance > Internet Configuration > Email Settings - Enter SMTP server, username, and password.
User Security
To grant access to the scheduler:
-
Go to:
File > Security > QSend > SchedulerAssign permissions per user/group:
- Allow Report Scheduling
- Display Scheduler Log
- Scheduler Status
- Scheduler Configuration
Scheduler Configuration Tabs
Notification
- Configure admin email alerts for task/report status.
- Optional: email logs with custom or default subject lines.
Sleep
- Set sleep time and duration (15–480 minutes) to align with backups.
Tasks
- View, add, edit, or delete miscellaneous tasks.
- Access logs for each task.
Miscellaneous
- Enable self-updates after new EQ versions.
- Print/view Scheduled Job Information report.
Task Types and Scheduling Options
Below are some common task types and their available intervals:
| Task | Description | Intervals |
|---|---|---|
| Export EDI/PDF Files | Export electronic orders | Daily, Hourly, Every 2 hours |
| Import EDI Files | Import external data | Daily, Hourly |
| Export Vendors to CRM | Push vendor data to QCRM | Daily, Monthly, Last Day |
| Verify Last Invoice Date | Run verification utility | Daily, Monthly, Last Day |
| ... | (Many more – see full task list in PDF) | ... |
Note: Each task can only be scheduled once.
Adding or Editing Tasks
- Go to:
QSend > Scheduler > Scheduler Configuration > Tasks tab - Click Add to create or Edit to modify a task.
- Choose job type, interval, start time, and notification options.
Scheduling Reports
- Set sort and range selections first.
- Use relative dates like "today" or "month to date."
- Click the Auto Scheduler icon on the report screen.
Report Intervals
- Daily
- Day of Month
- Weekly (1st–5th week)
- Last Day of Month
- One Time Only
- On Demand
Notify and Email Options
- Enter a Notify Email to send report copies.
- Configure delivery method and cover page remarks.
Running Reports Immediately
- Highlight a scheduled report and click Run Now from the configuration screen.
Logs
- View logs by highlighting a task and clicking View.
- If the button is inactive, toggle Auto Refresh off/on.
- Logs indicate success/failure and troubleshooting messages.
Deleting Tasks or Reports
- Highlight the task/report in the configuration screen.
- Click Delete to remove it.
Display Scheduler Log
Access via: QSend > Scheduler > Display Scheduler Log
- Filter by date, task type, status, and user.
- View additional details and task-specific logs (if available).
- Note: Logs are auto-purged after 30 days.
Scheduler Status
Check the current status (Running, Sleeping, Waiting) and change it as needed from the Scheduler Status screen.
Launching the Auto Scheduler
-
Double-click the Q-Scheduler icon on the desktop.
Click Start to begin processing tasks.
Click Menu to:
- Exit the Scheduler
- View Scheduler Activity
- Resume or Suspend tasks