
DBC: Chili - Company Profiles
When set up correctly, Company Profile Groups allow you to manage shared data in one central location while enabling multiple templates to reference that information.
This is especially useful for customers with multiple locations or those using features such as an employee list dropdown.
To take full advantage of this functionality, ensure that all variables in your CHILI templates are named consistently across documents. Consistent variable naming ensures seamless data integration across all templates and items.

End users are presented with a dropdown of employee names. Once a name is selected, data such as name, title, address, email, and photo are prepopulated. In this example the end user can only change their phone number and card backer.
Setting up your variables in Chili Backoffice
- Set up your variables in Chili Backoffice. For example, if you are going to have an Address selection you would set up the following variables:
- Address
- City
- State
- Zip
-
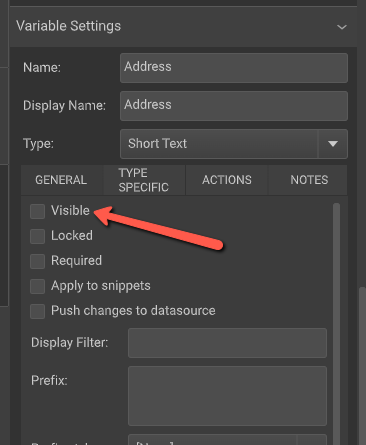
Under the Variable Settings > General Tab UNCHECK the “Visible” option for each variable. This hides the variables from the end user, so when you create your list in Step 3, the user will see a single selection that automatically populates these hidden fields. This gives you control over those variables, as the end user will not be able to edit them directly.
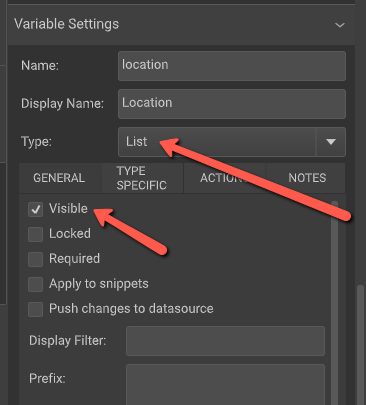
- Create a new variable that will be your end user selection. For this example, you could use “location.” This is the variable that will be visible to the end user, allowing them to choose from a dropdown that will automatically populate the hidden variables configured in Step 1.
- Under the Variable Settings > Type = List
-
Under the Variable Settings > General Tab CHECK the “Visible” option
- The Chili Backoffice setup of variables is now complete


Setting up the Company Profile Group
Go to the customer site you will be adding this item on. Login as an Admin User and select “Work with Profiles” (If you don't see this option, it's not enabled at the company or group level and just needs to be enabled.)
Profile Group List
- Click “Create New Profile Group”
- Enter the following information:
- Profile Group Name - The name of your profile
- Auto Populate Variable Name - The name of your VISIBLE variable in Chili Backoffice. This will be the trigger on what to show in the dropdown selection. (The name of your variable in Chili Backoffice must match what you are adding here.)
- Click “Save”
- Click “CUSTOM” (Do not use the option "Create Fields from Item (Chili Items)")
- Under the Name column, enter your non-visible variables from your Chili Document. (The name of your variables in Chili Backoffice must match what you are adding here.)For this example, that would be:
- Address
- City
- State
- Zip
- Under the Name column, enter your non-visible variables from your Chili Document. (The name of your variables in Chili Backoffice must match what you are adding here.)For this example, that would be:
- Click Back to Profile Group List
- Activate Company Profile Group (if you don't see your list of profiles, make sure the list is activated. You can do this before or after setting your values.)
This will determine the data entered will populate in the correct areas.

Permissions
Set Values
You are now ready to add data that will populate once a value is selected from the “location” dropdown.
- Select “Set Values”
- Select your Profile Group from the dropdown
- Select “Add New”
- Enter your data in the variable fields
- Name is the value the end user will see and select from the “Location” dropdown
- The other values are the variables you set up in Chili Backoffice and added to your Company Profile
- Save

Import/Export
More info coming....
Getting a Correctly-Formatted Template
The best starting point is to download a blank template directly from the system — this guarantees the headers match exactly what the profile group expects. In the Company Profile admin area, navigate to the Import/Export tab, select the appropriate profile group, and click "Download Blank Template." The resulting file will have the correct column structure pre-built.
CSV Format Requirements
- Delimiter: Comma (
,) - Encoding: UTF-8 (special/Unicode characters are supported)
- First row: Header row — first column must be
Profile Name, followed by field names matching the profile group - First column of every data row: The profile name — this is used to match existing profiles for updates, so it must be consistent
- Remaining columns: Field values corresponding to the headers
Common Issues to Avoid
A few things that are known to cause problems on import:
- Trailing commas / empty trailing columns — The CSV parser is sensitive to trailing empty columns at the end of rows. If your spreadsheet application adds extra empty columns, remove them before saving.
- Unrecognized column headers — If the profile group is item-based (rather than "Custom"), any column header that doesn't match a defined field will cause the entire import to fail with a validation error. Always use the downloaded template to ensure headers are correct.
- Profile name changes — The profile name is used as the unique identifier for updates. If a profile name in the CSV differs from what's already in the system (even slightly), it will create a new profile rather than updating the existing one.
- Quotation marks within values — If a field value contains a comma or quotation mark, the value should be wrapped in double quotes, with any internal double quotes escaped as two double quotes (standard CSV escaping).
Recommended Workflow for Premise
- Download the blank template from the Import/Export tab for the relevant profile group
- Use that template as the basis for their data file — do not add or rename columns
- Remove any trailing empty columns before saving
- Submit the file for upload