
DBD: Manual Checks, Reversals, Prepayments, and Voids
There are times when it is necessary to reverse a payment, record handwritten checks, or log a ruined check number. The Manual Check program is used to handle these administrative exceptions.
Supported Check Types
- Handwritten: Used to record manual checks that were not computer-generated.
- Reversal: Used to reverse and adjust a previously created, entered, or updated check.
- Void: Used to record physical check numbers that were ruined or skipped, ensuring your sequential check registry remains unbroken.
Reversing a Previously Written Check
A Reversal is used to adjust a check that was processed in the system but never given to the vendor (e.g., it was lost in transit, damaged, or the payment was canceled).
- Automatic Reversals: Enter the check number. If the check detail still resides in active system memory, the reversal process is automated. Click Yes when prompted by the system. You will receive a final confirmation window; click OK to clear the screen and complete the entry.
- Manual Reversals (Historical Records): If you enter an older check number that has already been purged from your active data files, DemandBridge cannot retrieve the information automatically.
Historical Reversal Rule: When reversing an archived check, the system will present a different prompt notifying you that the data cannot be retrieved. You must manually fill in all fields, and all financial amounts must be entered as negative numbers.
When you launch the program, the system automatically defaults to the current Fiscal Year and Accounting Period.


Entering a Handwritten Check
Recording a Handwritten check is a two-step process: first, you record the baseline check metadata; second, you apply the payment to one or more vendor invoices.
Step 1: Record the Check Metadata
- Verify that your Fiscal Year and Accounting Period are correct.
- Enter the Bank Account Code from which the check was drawn.
- Select Handwritten from the Check Type dropdown list.
- Enter the physical check number. When the system prompt asks you to confirm adding the entry, click Yes.
- Input the Check Date, Vendor Code, and the Check Amount.
- Click OK to confirm the information is correct.
The Balance Field Rule: The amount you input populates the Balance field. This field represents the funds remaining to be distributed from this check. As you apply the check to various invoices, this balance will deplete. You will not be able to exit the program until this balance is exactly $0.00.
Step 2: Manual Check Invoice Entry
After completing the metadata, you must route the payment. This workflow splits depending on whether the target invoice is already open in your system or brand new:
Scenario A: Paying an Invoice Already on File
- Enter the target invoice number. The following prompt will confirm that you have entered a valid invoice number. Click Yes.
- All underlying data defaults directly from the open file. Note: No new General Ledger distribution will be made since the liability was already accounted for when the invoice was originally posted.
- For Full Payment: Accept the defaulted values and click Update.
- For Partial Payment: Navigate to the Gross Applied field and enter the specific amount you want to pay. The Net Amount Paid is calculated automatically as the Gross Amount less any discount taken.
- Click Update. The amount entered will immediately reduce your running Balance field on the check. Proceed to enter any remaining invoices you intend to pay with this check.

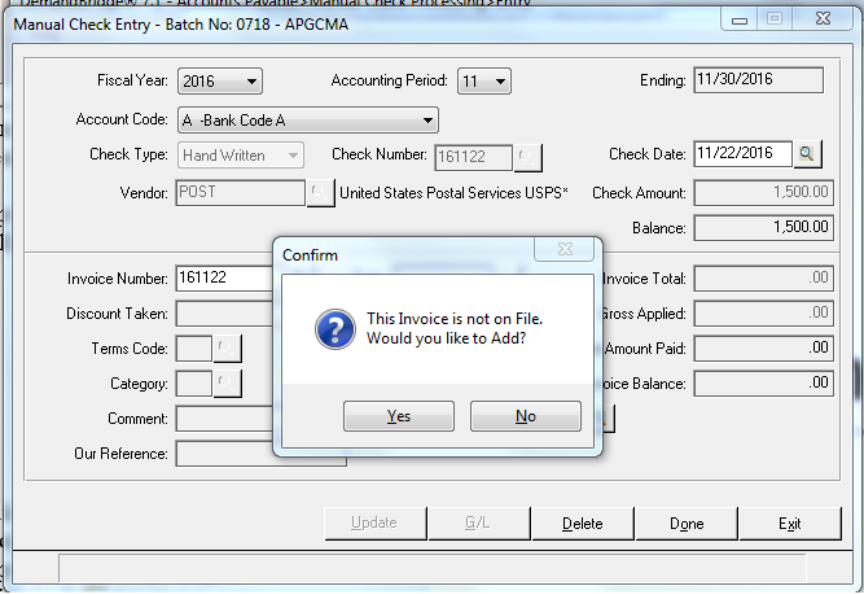
Scenario B: Setting Up and Paying a New Invoice
If you enter an invoice number that the system does not recognize, you must build the invoice layout on the fly:
-
When the system prompt notifies you the invoice is unrecognized, click Yes to create it.
-
Enter the Invoice Date and the Invoice Total. The program assumes you want to pay this amount in full and populates the Gross Applied field automatically (you can change this manually if making a partial payment).
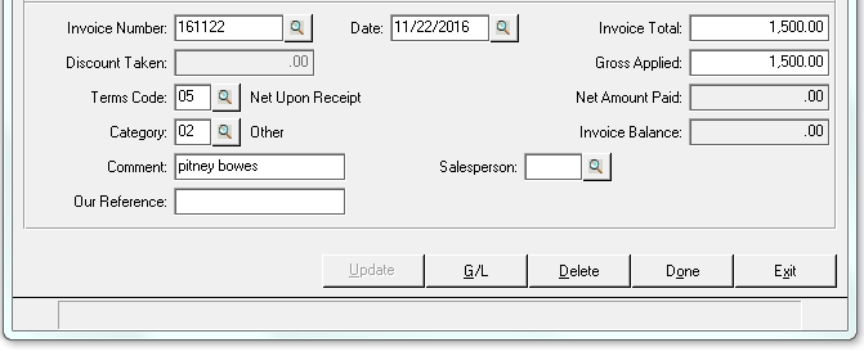
- Enter any relevant tracking comments or reference numbers.
- General Ledger Distribution: Because this is a brand-new invoice, you must assign its financial routing.
-
Data Entry Tip: If you use the Enter key to move through these fields, the system will automatically take you directly to the G/L screen. Alternatively, you can click the G/L button to proceed to the next panel.
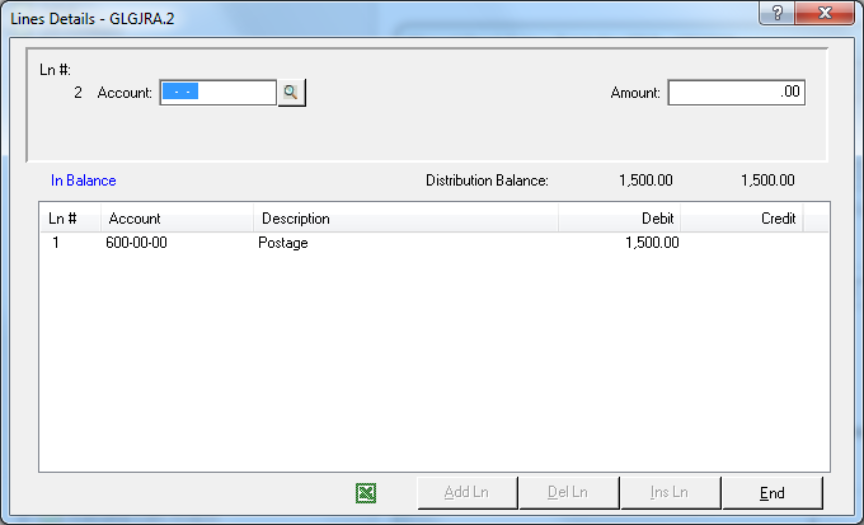
-
- If a default GL account is stored in the Vendor Master file, it will populate automatically; otherwise, assign the account manually now. Note that the amount can be distributed to multiple general ledger accounts if needed.


Entering a Vendor Pre-Payment
Use the Manual Check Entry program to record down payments or prepayments to a vendor before an official invoice is received. This sets up a credit transaction on the vendor's record while capturing the cash disbursement.
- Proceed exactly as you would for a standard Handwritten check entry.
-
When you reach the invoice panel, you must assign your own transaction number since no vendor invoice exists yet. If the prepayment is for an order you have already received, consider using the prefix PP along with the order number (e.g.,
PP10452).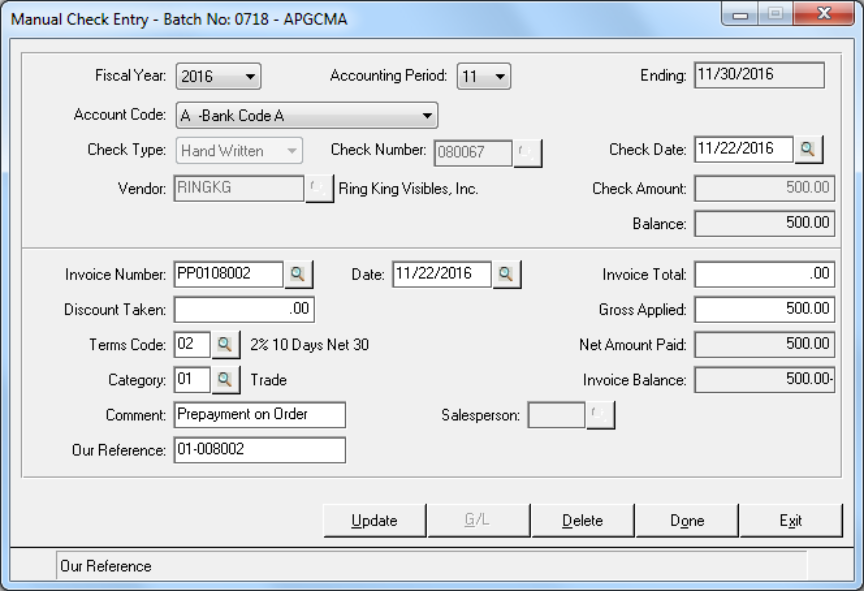
- Set the Invoice Total Amount to
0.00. - Enter the actual check amount in the Gross Applied field. This safely instructs the system to issue a positive payment against a zero-dollar invoice, creating an automatic credit balance (e.g.,
-500.00) on the vendor's account.

Logging Void Checks
To ensure your Monthly Disbursements Report remains perfectly sequential for auditing purposes, you can manually log ruined or spoiled check faces that were not automatically generated or previously entered.
- Select Void from the Check Type dropdown list.
- Enter the transaction Date and the ruined physical Check Number.
- This logs the number as unusable without tying it to any vendor transaction or general ledger liability.
Manual Check Audit Report & System Update
Path: Accounts Payable > Payment Processing > Manual Check Audit Report
The Manual Check Audit Report provides a comprehensive printout of all transactions logged within the manual entry batch. Review this report thoroughly for entry accuracy.
Executing the subsequent Update command permanently commits the batch and triggers the following system functions:
- Finalizes Records: Creates corresponding invoice and payment transaction records in the Open Invoice File.
- Adjusts Balances: Updates the master running Vendor Balance (if applicable).
- Populates Bank Rec: Registers an outstanding check record directly into the Bank Reconciliation (BREC) file.
- Tracks Tax Data: Adjusts the vendor's 1099 metric accumulations (if applicable).
- Compiles History: Rolls the transaction details into the Vendor Statistics logs.
- Logs Monthly Disbursements: Creates a permanent line item entry in the monthly disbursements file.
- Posts to Ledger: Executes formal postings directly to the General Ledger Detail Transaction File.
- Flushes the Batch: Clears the temporary Manual Check Entry File so it is completely fresh for subsequent entries.