
DBD: Cash Receipts 2 - Establishing a Deposit (Level 1)
Once you understand the high-level 3-Level Architecture of the cash cycle, your first physical task in the system is to establish a control bucket for your daily deposits.
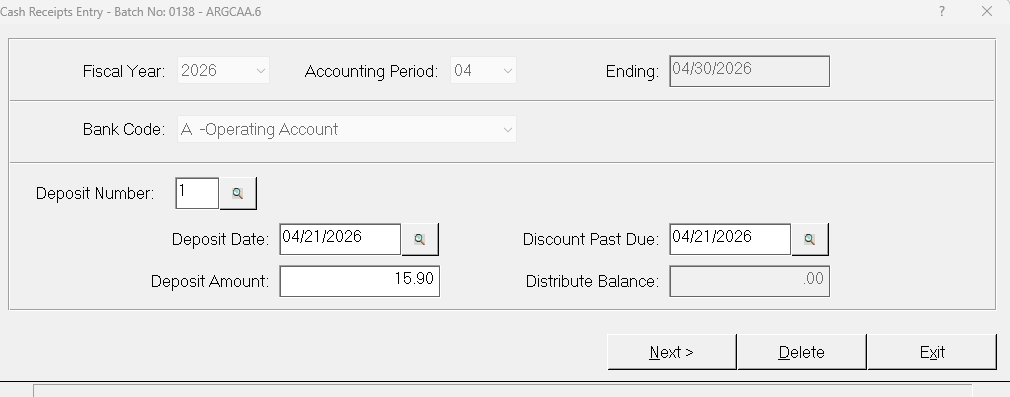
This guide walks you through Level 1: Establishing a Deposit, where you define your expected deposit parameters, set your operational dates, and initialize a secure workspace before entering individual customer checks.
Step-by-Step: Creating a Deposit Batch
Follow this procedure at the start of each daily deposit cycle:
Accounts Receivable → Cash Receipts → Entry
1. Establish Your Batch
When the Cash Receipts screen opens, the system will prompt to ask you if you wish to start a new Batch. If you are starting a new deposit, then answer YES. If you are modifying an existing batch, answer no and select the appropriate batch.
- Enter any remarks based on your department’s tracking standards. Many leave this blank.
- Click Save
3. Enter the Deposit Parameters
Once you have created your batch, complete the following fields in this panel:
- Accounting Period: Verify that the fiscal month matches your current active sub-ledger period.
- Deposit Number: This is typically sequential number and based upon how many deposits you will be posting today.
- Deposit Date: Enter the exact calendar date the funds are being hand-delivered to the bank or processed via your electronic remote deposit capture scanner.
- Deposit Amount: Key in the total dollar amount of your physical deposit slip. Do not include any leading characters or currency symbols.
4. Initialize the Workspace
Click Next. The system will create the deposit record and automatically open the sub-panel for Level 2 processing.
Next Steps in the Series
Your Level 1 container is now established. Leave this workspace open and proceed directly to the next guide to begin logging your individual customer payment files: