
DBD: Inventory Control Transaction Processing
The Inventory Transaction Entry utility allows you to record physical inventory Adjustments, Receipts, and Transfers. Transactions are entered into a temporary holding batch, reviewed via an audit journal, and then committed permanently to the inventory ledger and General Ledger (G/L).
Before You Begin
- The Asterisk (
*) G/L Safeguard: If you enter an asterisk (*) as the very first character of your batch Reference Number, the system will completely block all General Ledger postings for that batch while still updating physical inventory counts. Note: For Customer-Owned inventory transactions, the system automatically skips G/L posting, so the asterisk is not required. Common scenarios where you should use the asterisk bypass include:- Duplicate Receipts: If an inventory item was accidentally received into physical stock multiple times, but the financial ledger was already manually corrected or handled only once.
- SKU/Customer Conversions: When you need to remove inventory from one customer record using an Adjustment and immediately bring it back in under a different item code or customer using a Receipt. Since Receipts never post to the G/L, using the asterisk on the matching Adjustment prevents a one-sided financial mismatch.
- Bulk Value Corrections: If you are correcting values or costs across a large volume of items simultaneously and want to avoid flooding the general ledger with hundreds of individual lines. You can bypass the automatic entries using the asterisk, and then post a single, clean summarizing journal entry to bring the G/L back into perfect balance with your Valued Inventory Report.
Creating a Transaction Batch
Navigation: DB Distributor > Inventory Control > Transactions > Entry (I/C T1)

- Enter the target Fiscal Year and Accounting Period for the transactions.
- In the Reference Number field, enter a unique identifier (or use the search query to open an existing batch), then press Enter. (Remember the asterisk rule above if performing a non-posting transaction).
- Enter any internal tracking Remarks you want bound to this reference number.
- Select your Transaction Type:
Receive,Adjust, orTransfer. - Enter the Warehouse Location, transaction Date, and Vendor Code. (Note: Vendor code is strictly required for Receipts, but optional/not needed for Adjustments or Transfers).
- Enter the Customer Code (leave blank for standard company stock) and the Item Code.
- Choose Your Pathway: Depending on whether your item is configured as Lotted or Non-Lotted, proceed to the corresponding section below.
Transaction Execution Paths
Pathway A: Inventory Adjustments
For Non-Lotted Items:
- Enter the total quantity to adjust in or out, the transaction unit of measure, and the cost. The line item will auto-save.
- Cost Adjustment Tip: If you only want to change the per-unit cost of a non-lotted item, enter two lines: one negative line to completely zero out the stock at the old cost, and one positive line to bring the stock back in at the correct new cost.
For Lotted Items:
- Upon entering the item code, the system will automatically route you to the Lot Receiving Detail screen.

- Enter the Receipt Date and Sequence Number of the specific lot you are adjusting (or click the search query to view all active lots).

- Modify the quantity or total cost fields as needed.
- To Delete a Lot: To completely wipe a lot record from the system, select the lot, change the quantity field to
0, and completely zero out the Cost field. - Click Save, then click Exit to return to the main panel.
Pathway B: Inventory Receipts
For Non-Lotted Items:
- Enter the quantity received, the cost per receiving unit of measure, and the package counts. The line will auto-save.
For Lotted Items:
- The system will open the Lot Receiving Detail screen. Enter the Receipt Date and a unique counter Sequence Number (e.g.,
1,2,3). Select Yes to create the new lot record. -
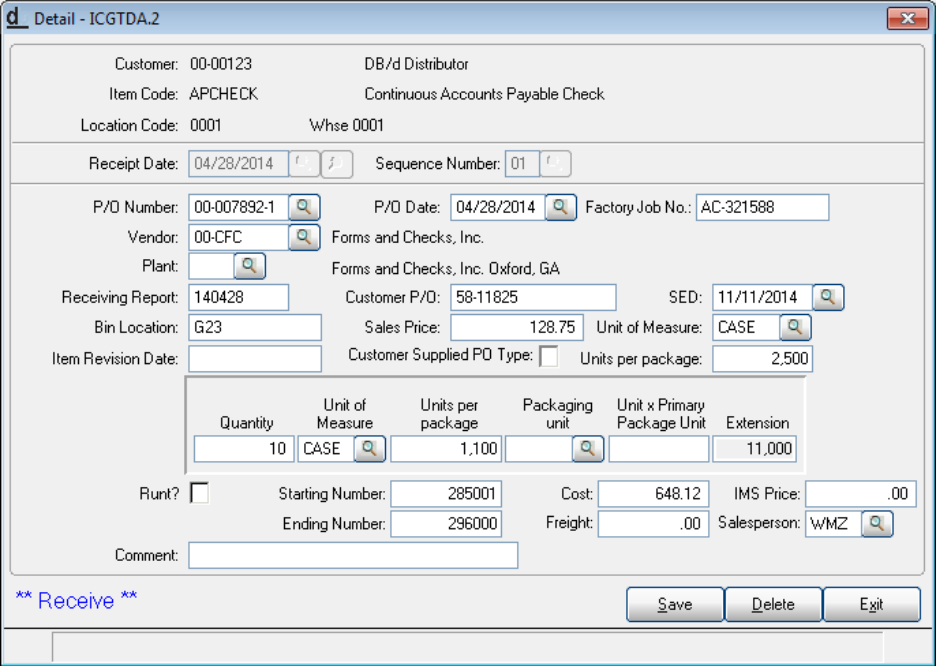
- Input the PO Number/Date, Bin Location, Storage Expiration Date, and an optional Sell Price if the lot has a hardcoded baseline price.
- Enter the quantity received and the Total Cost associated with the lot (this value directly populates your Valued Inventory Report).
- Optional Outgoing Freight: Enter a freight value if you want a fixed outgoing freight amount charged automatically whenever this inventory lot is released downstream.
- Click Save, then click Exit to return to the main panel.

Pathway C: Inventory Transfers (Moving Locations)
Note: The system strictly blocks any inventory transfers across separate ownership lines.
For Non-Lotted Items:
- Enter the transfer quantity and packaging details, then simply enter the target warehouse destination code. The line will auto-save.
For Lotted Items:
- The system will open the Inventory Lot Selection screen displaying all available lots and locations.

- Click the quantity field next to the lot you wish to pull from, and enter the quantity to transfer (all or a portion of the lot).
- Return to the main panel and enter the destination warehouse location code in the To Location field. The system will auto-save the movement.

Posting and G/L Impact
1. Journal Update (I/C T2)
Before any inventory changes take effect or hit your ledgers, you must print and verify your transaction batch journals.
Navigation: DB Distributor > Inventory Control > Transactions > Journal Update (I/C T2)
- Select your active transaction batch from the Batch Query.
-
Click Output Options to verify your target printer or preview settings.
Click Print Report.
- Note on Transfers: When printing a transfer batch, the system outputs three distinct verification sheets: the Inventory Transaction Journal, the Inventory Transfer Journal, and the Inventory Lot Journal. Review all three.
- Final Commit: If the journal printouts are free of errors, click Update to finalize the batch and commit the changes. If errors are present, exit the panel, return to I/C T1 to correct the lines, and re-run the journal.
2. General Ledger Impact Quick Reference
- Adjustments (Distributor Owned): Creates a standard G/L entry hitting your main Inventory Account, with an offsetting entry balancing out to your Inventory Adjustment Account.
- Receipts: The system does not create an immediate G/L entry during this step. It assumes the matching financial ledger entry will be recorded separately via Accounts Payable Invoice entry later.
- Transfers: Only impacts the G/L if your system parameters are explicitly configured to post to the general ledger by individual warehouse locations.
🎯 Expected Outcome: Inventory balances, lot sequences, and total asset costs are accurately adjusted, received, or moved across warehouses while maintaining flawless ledger sync via the batch review process.