
EQD: DBPay - Activating and Sending PaybyLink
Made by Paula Leon with Scribe
This guide provides a comprehensive overview of activating and utilizing the PayByLink feature, which streamlines payment processing for invoices and purchase orders. It covers essential configurations, customization options for email receipts, and step-by-step instructions for sending payment links. By following this guide, users can enhance their payment collection efficiency, improve client communication, and ensure a seamless transaction experience. It's an invaluable resource for anyone looking to optimize their accounts receivable processes.
Alert: Note: This process was created in a test environment. The information selected is for training purposes only and will not match the data you will use in your company's system.
1. Go to A/R > A/R File Maintenance > A/R Configuration.
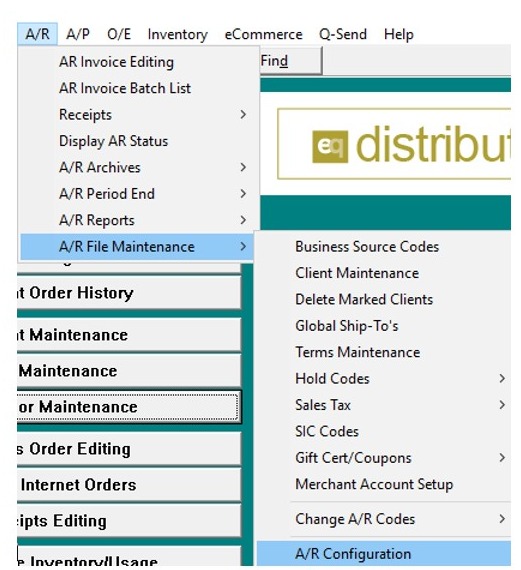
2. Click the Pmt tab, then click CC/ACH/PayByLink Options.
This button opens all the merchant account, credit card/ACH, receipt, and PayByLink settings.
Note: The same button is also available at the Department, Consultant, and Client levels, so you can override these settings where needed. For details, see EQD: PayByLink Settings.
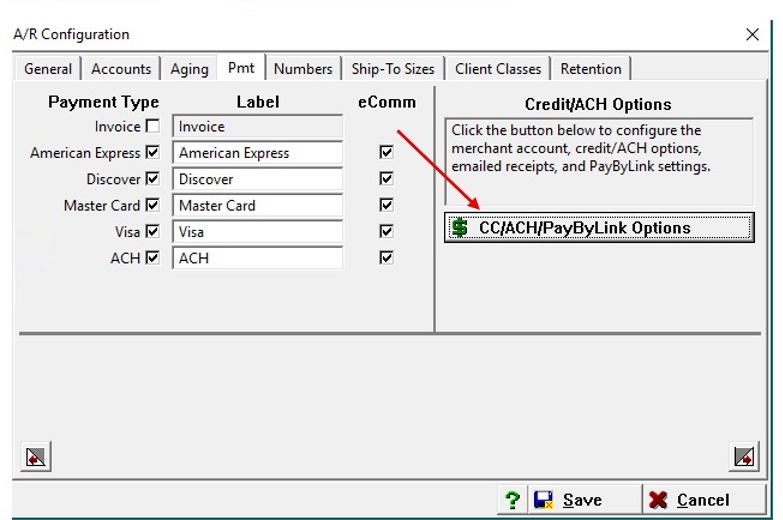
3. Conv Fee tab
The System Level DBPay Options screen opens. Make sure the eComm Merchant ID is set to your DBPay account.
On the Conv Fee tab, you set up convenience fees:
- Charge Convenience Fees to Client: Choose whether clients are charged a fee.
- Fees Are Taxable / Commissionable: Choose Yes or No.
- Invoice # for A/R Convenience Fees: Choose whether to create a new invoice number or add a character to the existing one. If you add a character, pick it in Append Character.
- Convenience Fee Name: The label the client sees. Leave blank for the default.
- Credit Cards / ACH: Enter the fee amount for each. You can also choose to charge part of the fee back to the consultant.
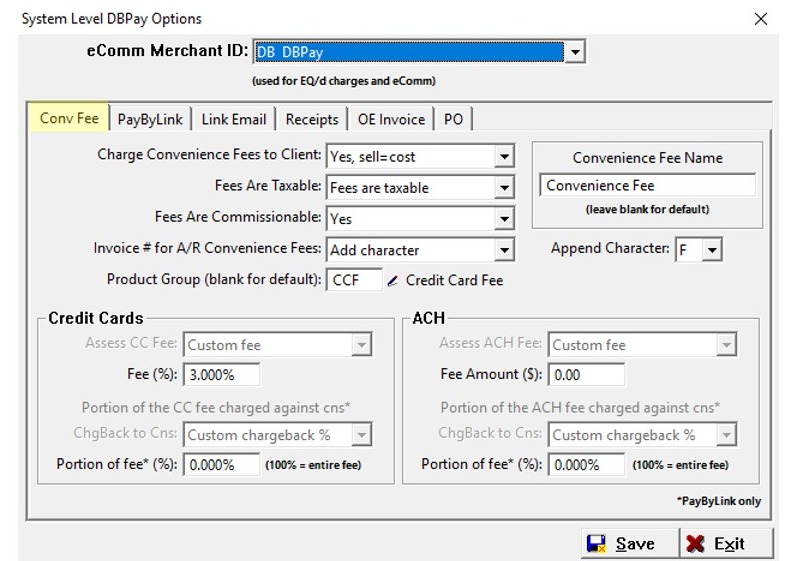
4. PayByLink tab
- Allow PayByLink: Turn PayByLink on or off.
- Allowed Link Types: Credit Card, ACH, or both.
- Preferred Type: Which payment option shows first.
- Expire Days: How many days the link stays active (up to 60).
- Prompt-pay Discount: Choose whether to offer a prompt-pay discount.
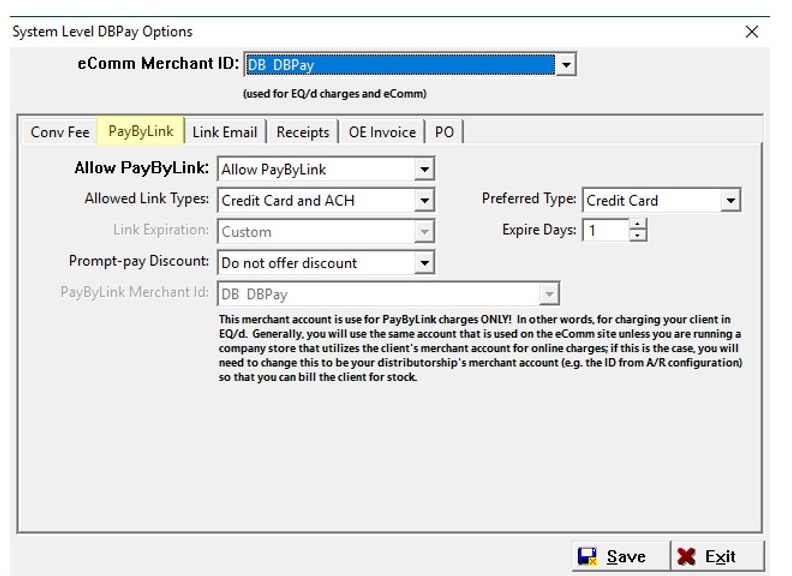
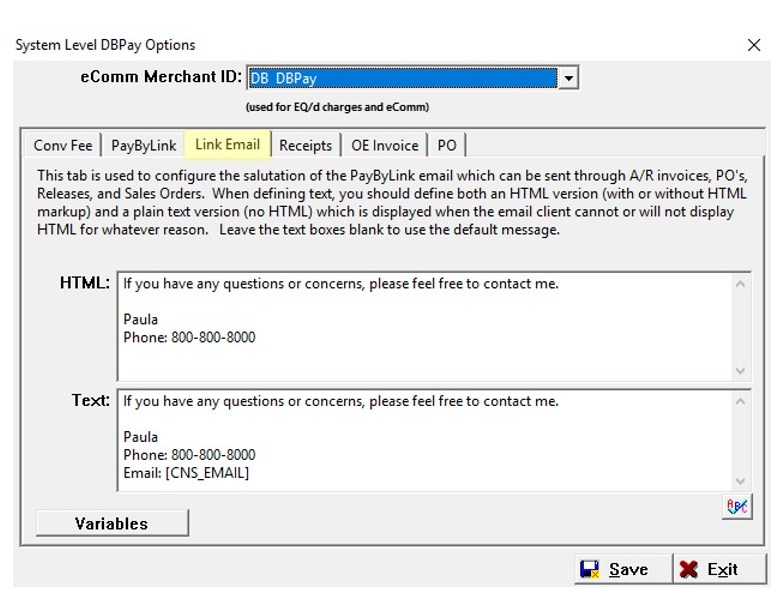
5. Link Email tab
This tab sets up the closing message (salutation) of the PayByLink email for A/R invoices, POs, releases, and sales orders.
- By default, the message uses variables that automatically fill in the consultant's (CNS) information, such as name and phone number. Click Variables to see which ones it uses.
- You can type over the default with your own text. In this example, we typed our own message instead of using variables.
- Fill in both the HTML and Text boxes, since the client may receive either version.
- Leave the boxes blank to use the default message.
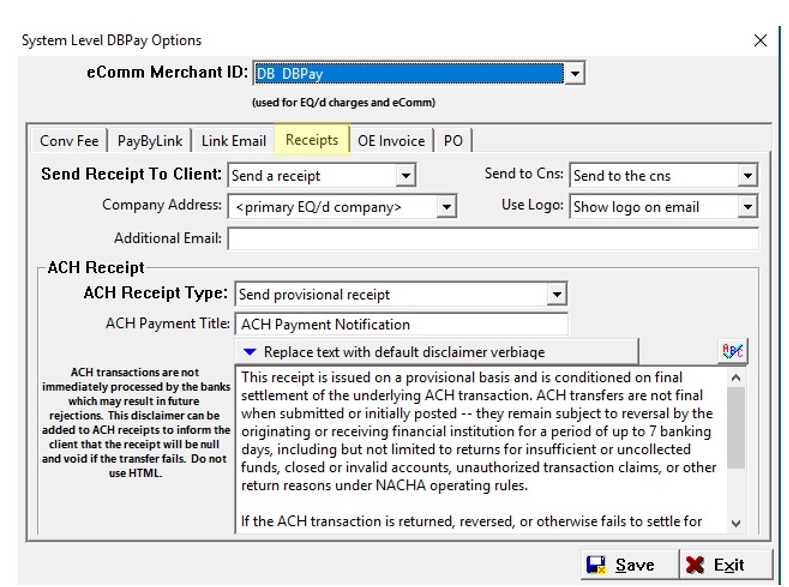
6. Receipts tab
- Send Receipt To Client: Choose whether the client gets an emailed receipt after paying.
- Send to Cns: Choose whether to copy the consultant on the receipt.
- Use Logo: Show your logo on the email.
- Additional Email: Add another address to receive a copy.
- ACH Receipt Type: ACH payments aren't final until they clear the bank. Choose Send provisional receipt to include a disclaimer letting the client know this.
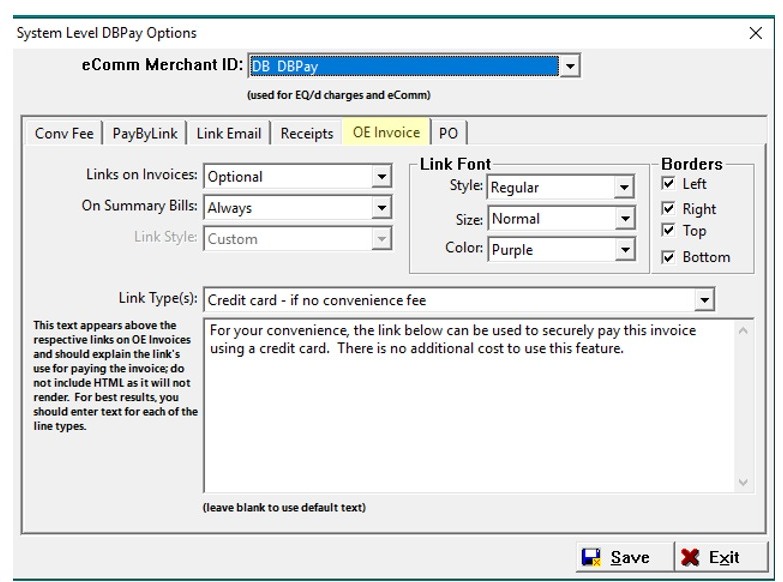
7. OE Invoice tab
- Links on Invoices: Optional, Always, or Never.
- On Summary Bills: Choose whether the link shows on summary bills.
- Link Font: Set the link's style, size, and color.
- Borders: Add borders around the link to make it stand out.
- Link Type(s): Choose a link type and enter the message that prints above that link on the invoice. Leave blank to use the default text.
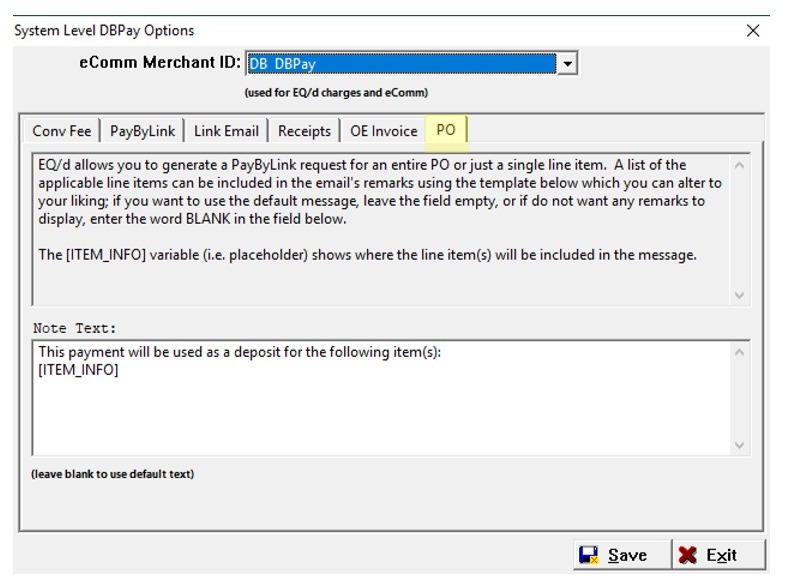
8. PO tab
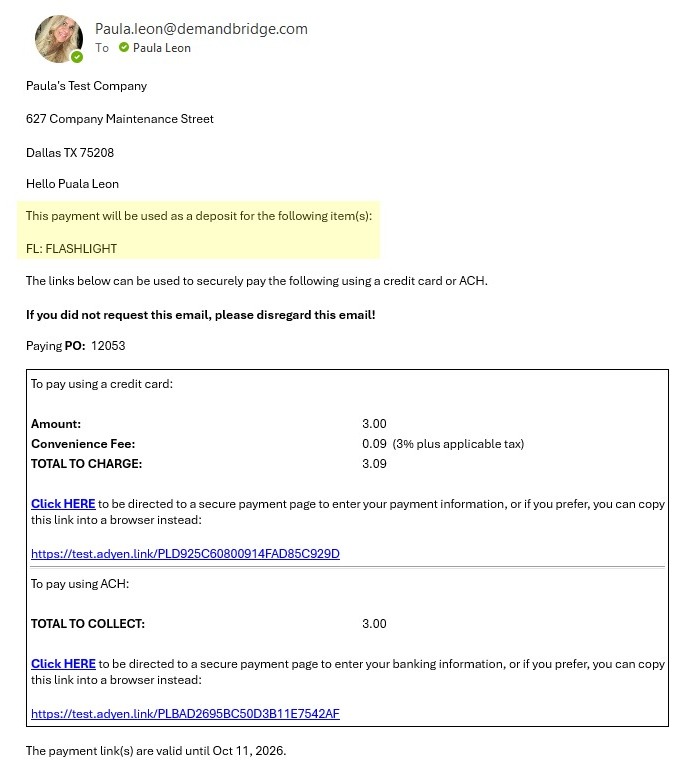
This tab sets the note that appears when you request a deposit on a PO.
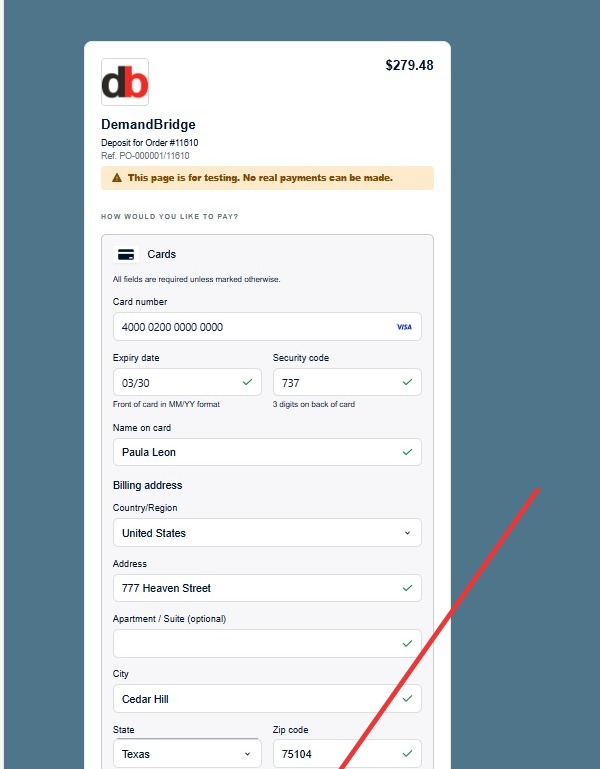
The [ITEM_INFO] placeholder automatically shows the line item(s) being paid. If you don't want any note, type BLANK.
Click Save, then Exit.
Activating PayByLink
Alert: If you don't want to use the PayByLink (PBL) feature (you don't want to send a secure link for any documents), you have two options:
Turn it off for everyone: In the System Level DBPay Options, go to the Pay By Link tab. In the Allow Pay By Link drop-down, select Do not use Pay By Link.
- Keep it on, but turn it off for certain clients: Leave it on at the System level. Then, at the client level, go to the Pay By Link tab and select Do not use Pay By Link for any client who shouldn't have it.
This keeps the PayByLink option off documents, both A/R invoices and any document with the credit card box option. The PBL option will simply not appear.
Tip: Scenario #1 – Sending Link via A/R (Invoice Posted & Open)
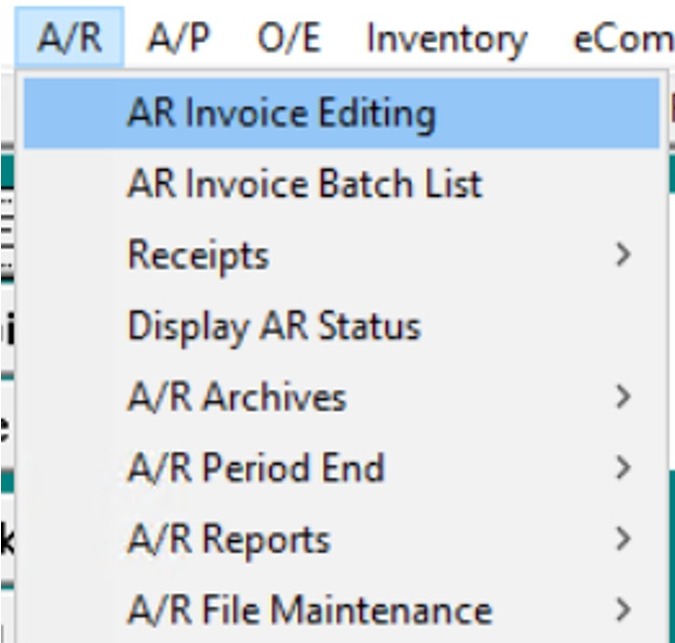
9. Go to A/R > A/R Invoices
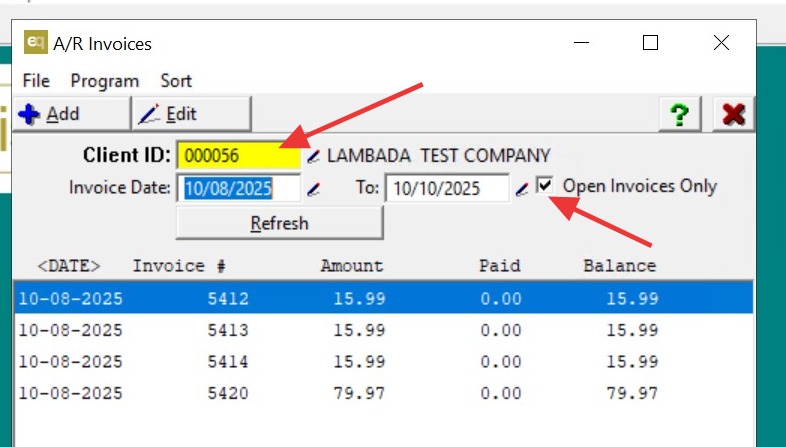
10. Select client → check Open Invoices Only
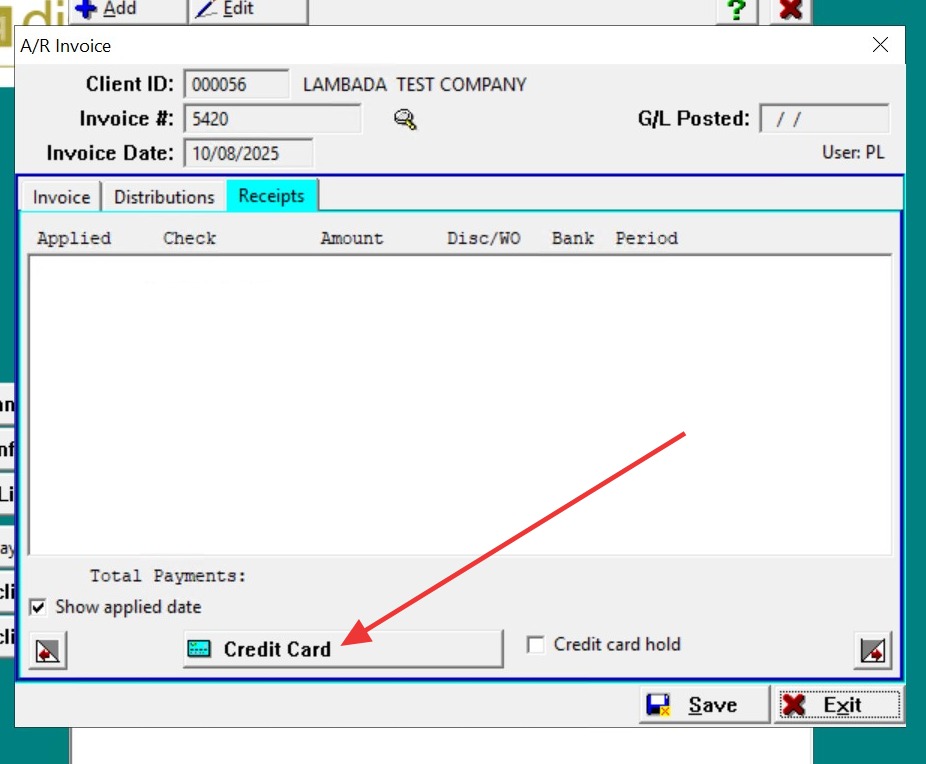
11. Open invoice → Receipts tab > Credit Card.
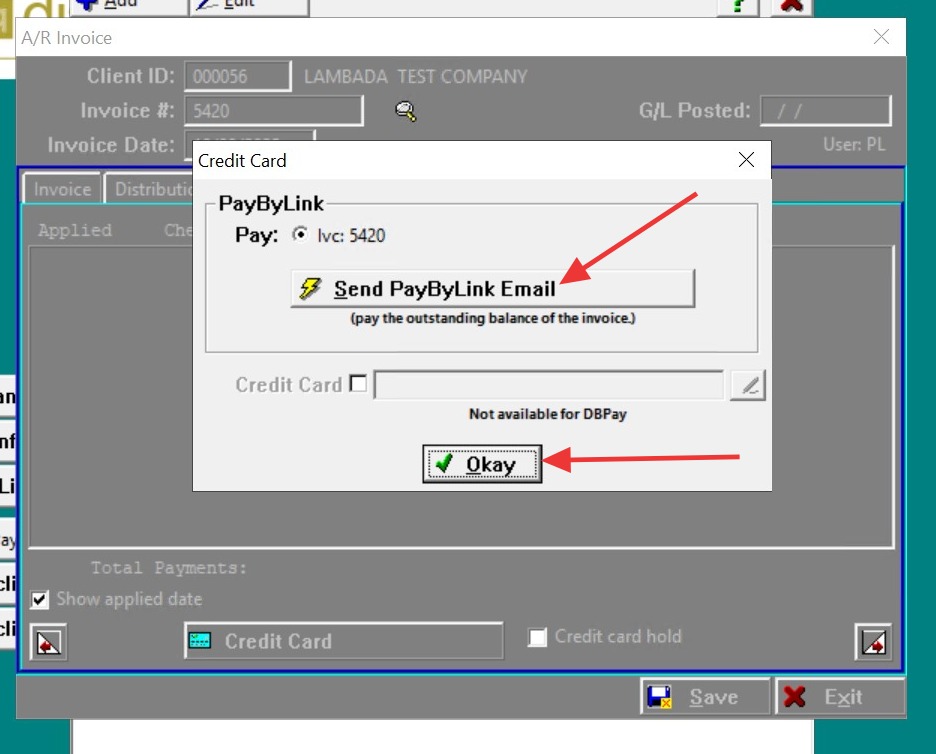
12. Click " Send PayByLink Email" then "Okay"
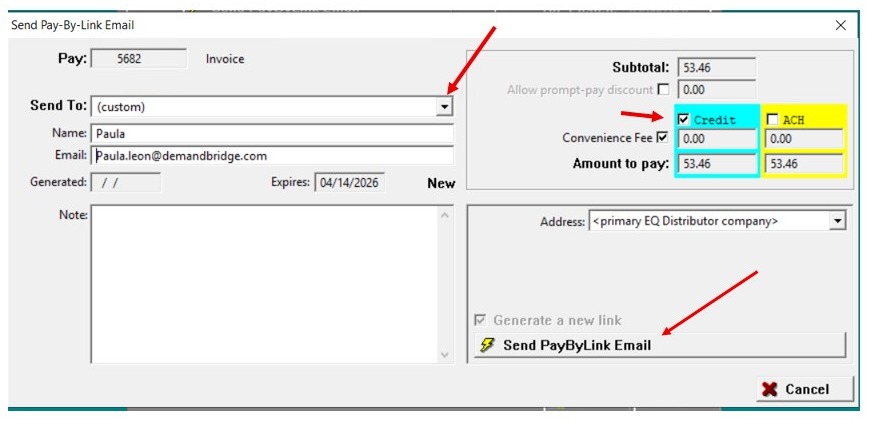
13. This screen shows the link total and gives options for sending the PayByLink:
- Payment Method: Check or uncheck Credit Card, ACH, or select Both.
- Convenience Fee: Optionally uncheck the convenience fee if you don’t want it applied.
- Special Notes: Add any custom notes to include in the email.
- Send To: Use the drop-down to send to a custom email address instead of the default client contact.
- Click “Send PayByLink Email.”
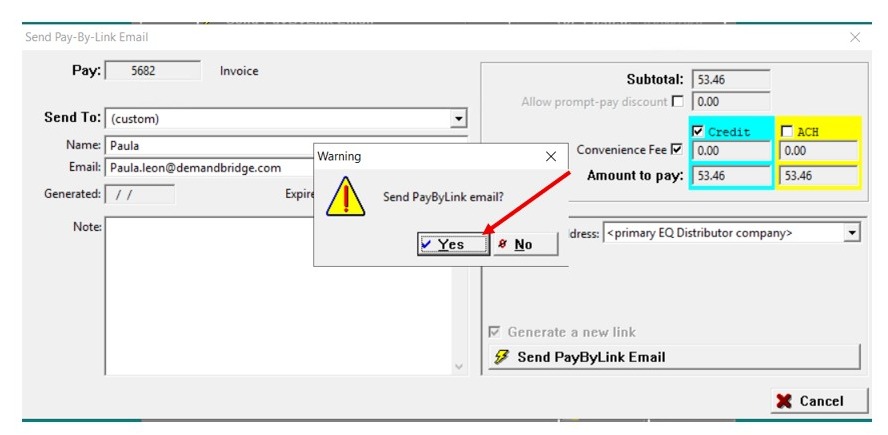
14. Click "Yes" to send PayByLink email.
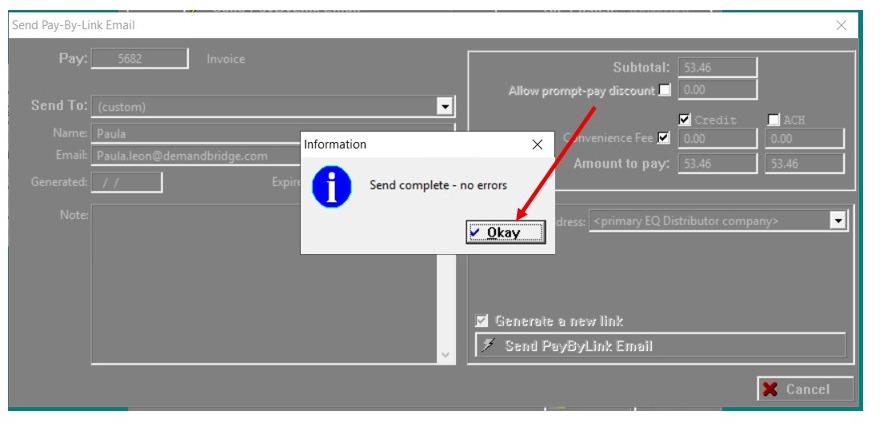
15. Click "Okay" when send is complete.
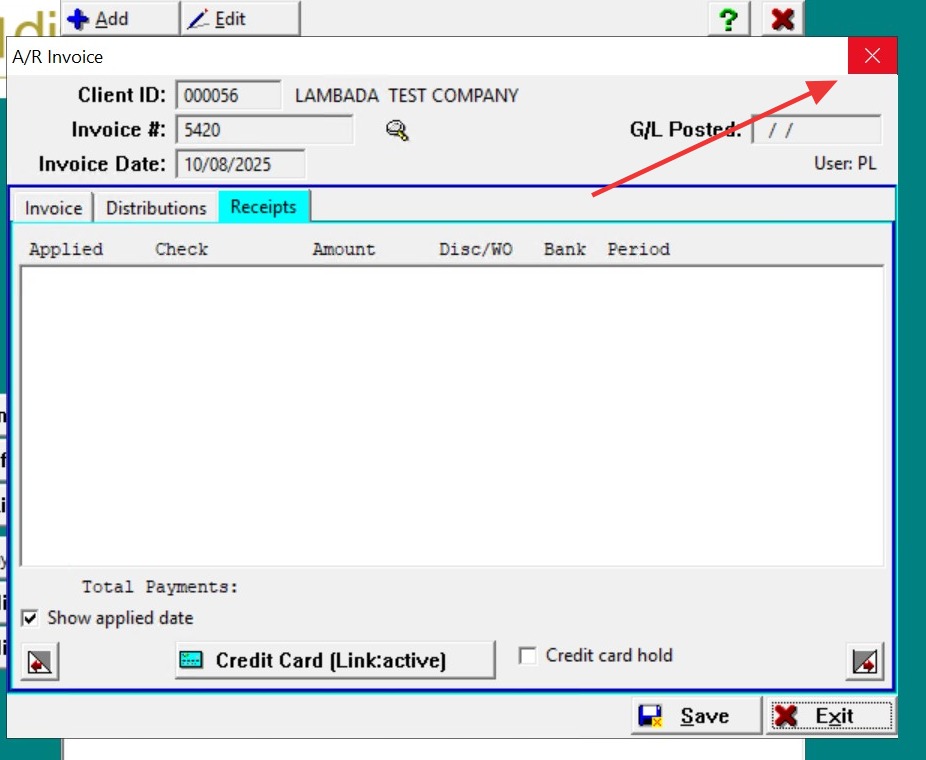
16. Click "Exit"
To download PayByLink payments
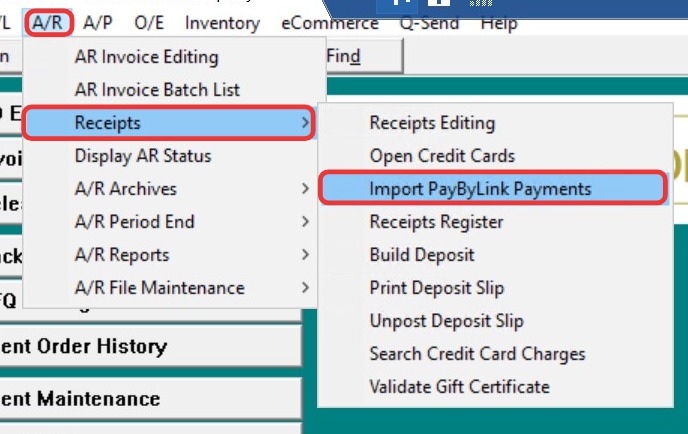
17. Navigate to A/R > Receipts > Import PayByLink Payments.
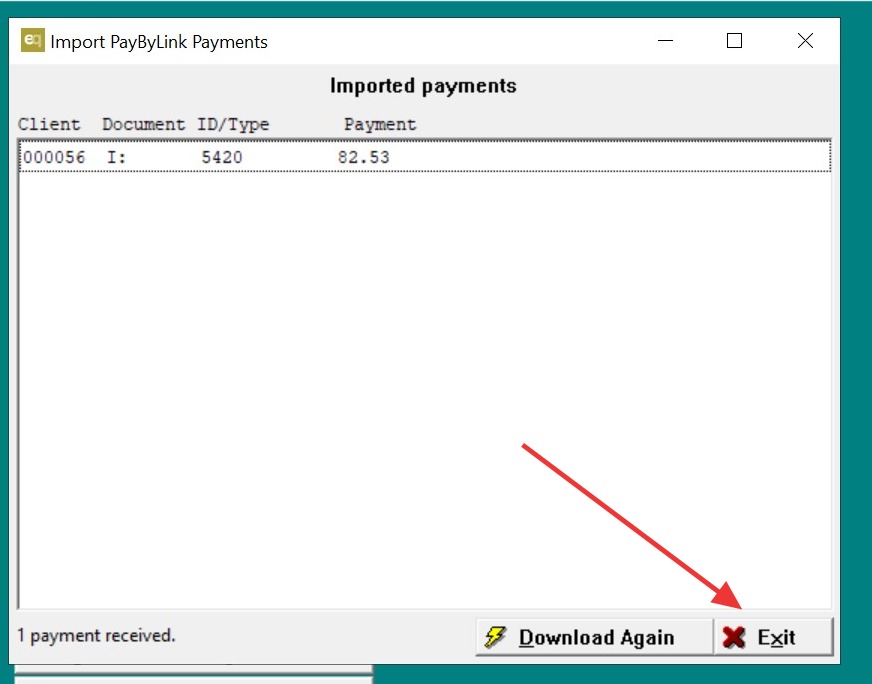
18. The system will check the links and display the ones that were paid. Once the Import Payment Details screen shows, you can Exit.
Note:
- The Download button at the bottom is available if you need to download again in case any payments were made after your initial download.
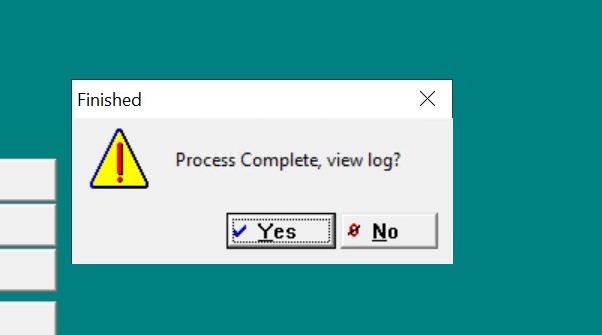
19. When prompted, click Yes or No to view the log.
- Note: The log provides full details of the process—from the time the link was sent to when the payment was downloaded.
- To print the report, click File in the upper-left corner and select Print.
- Exit all the way out.
Tip: ### Downloaded PayByLink Payments
When payments are downloaded, the system will mark the invoice as Paid and create a Receipt in Receipts Editing.
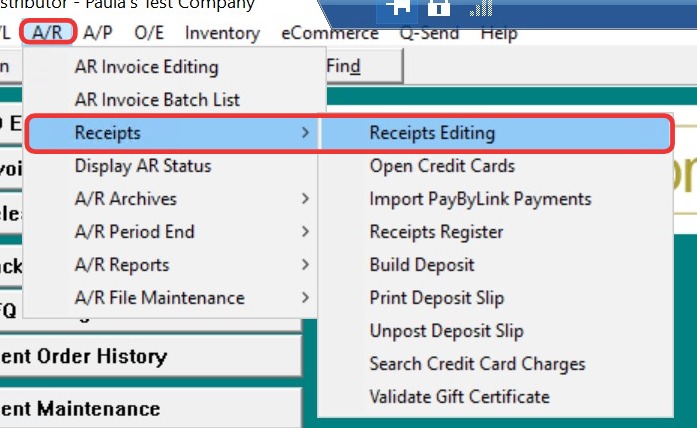
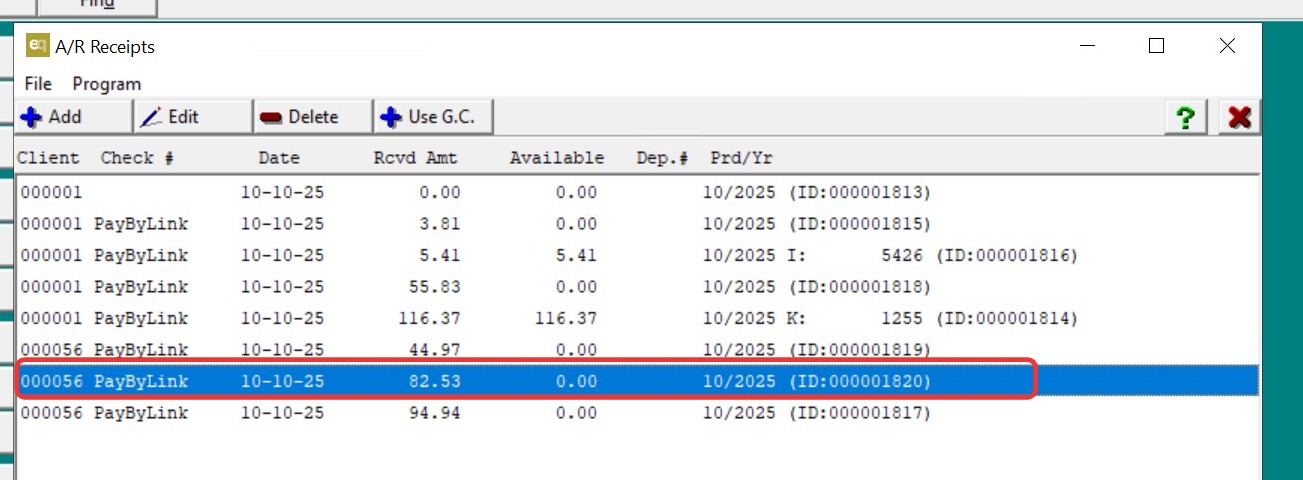
20. Navigation: A/R > Receipts > Receipts Editing
21. ### Sample Screen
Displays key information including:
- Client ID
- Check # (shows PayByLink if paid via link)
- Date
- Received Amount
- Available Amount
- Deposit # (if the receipt was deposited)
- Period
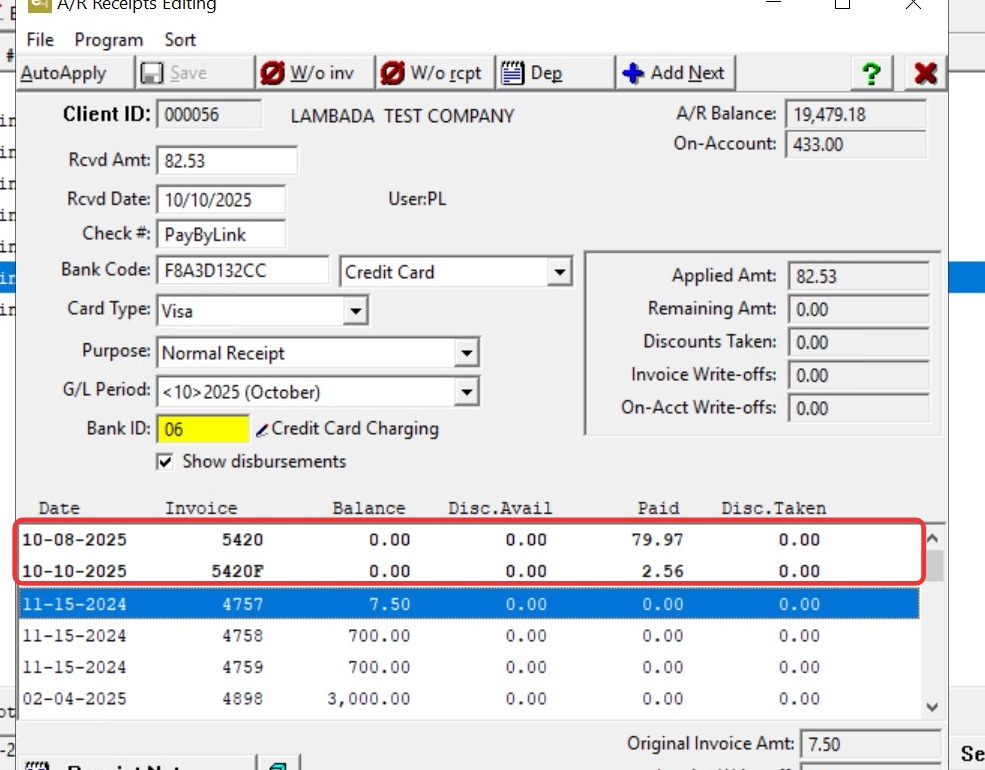
22. ### Payment Details Screen
This screen displays both the convenience fee and the invoice fee that the payment was applied to — shown at the very top and in bold.
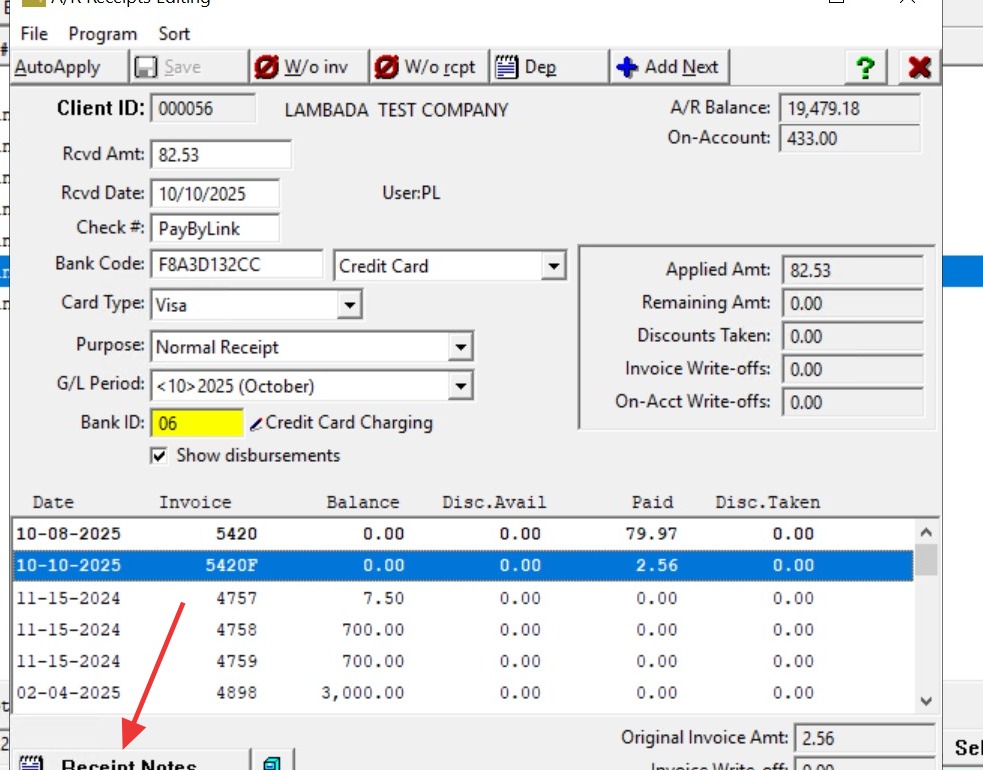
23. ### Receipts Notes
Click Receipts Notes to view system-generated notes created for every PayByLink transaction.
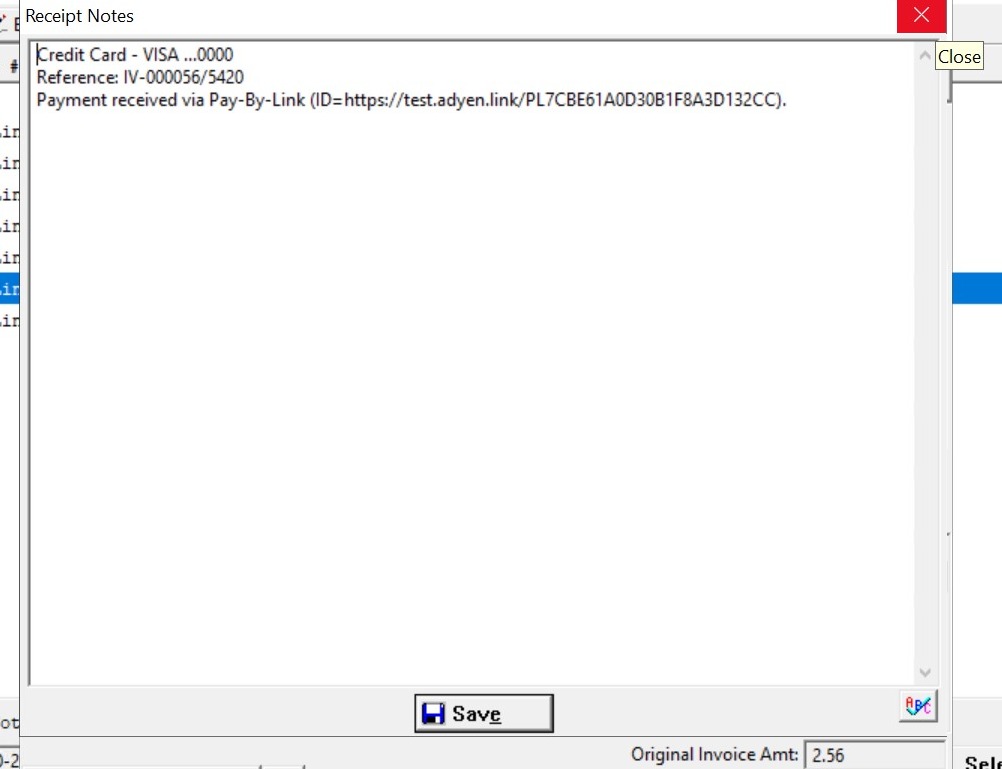
24. ### Receipts Notes Details
Displays:
- Last four digits of the credit card number
- Reference: Client ID and invoice paid
- How payment was received
- Link ID # that was used
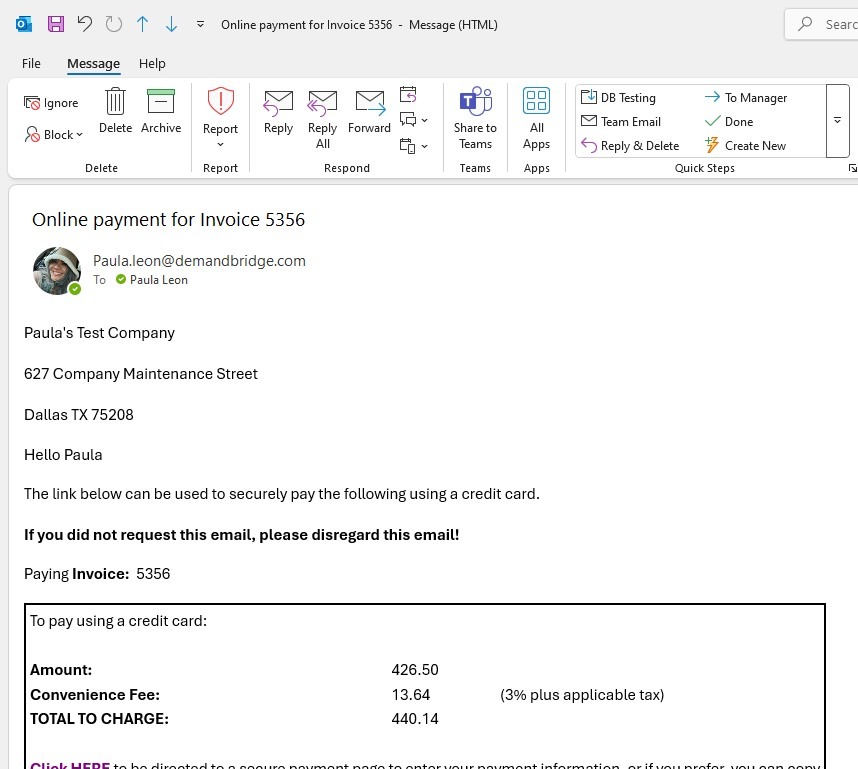
25. ### Link Emailed to Client
The subject line will read:
“Online Payment for Invoice XXXX”
The email includes all the information the client needs to know before submitting their payment.
26. After Payment is Made
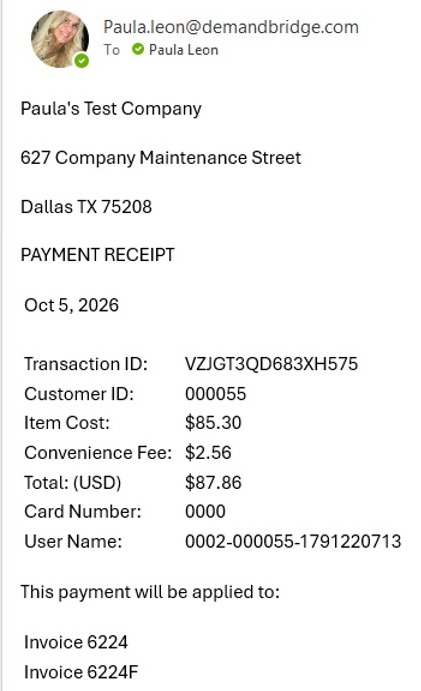
Once the link is paid and the payment is downloaded, the system automatically sends the client a receipt. The receipt breaks down the product total and the convenience fee, and shows both invoice numbers: the original invoice and the convenience fee invoice.
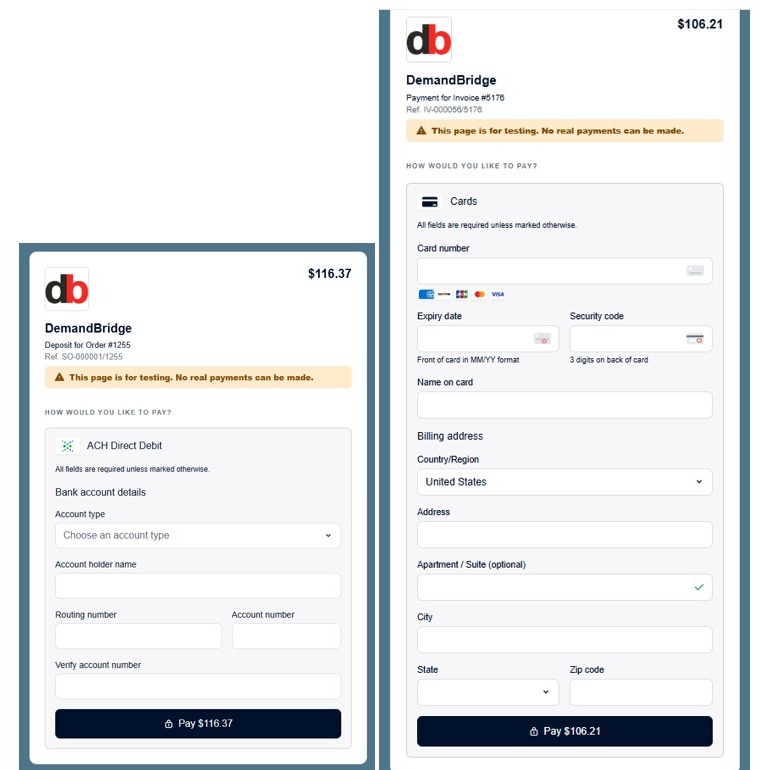
Tip: ### Depending on your PayByLink settings, the payment screen will vary:
27. - If paying only by ACH, the ACH detail screen will appear.
-
If paying by credit card, the credit card detail screen will appear.
It will display one or the other, depending on the configuration.
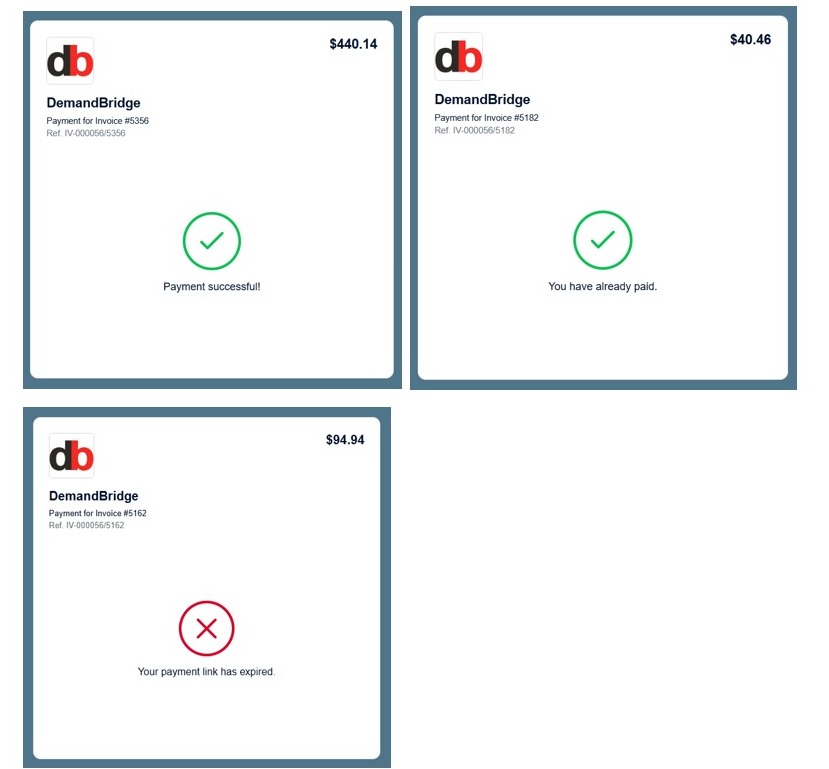
Tip: Once the payment is completed, one of the following messages will appear:
28. - Payment successful – Payment has been processed successfully.
- You have already paid – Appears if the client clicks the link again after completing payment.
- Your payment link has expired – Appears if the link is no longer valid.
If the link has expired, it can be resent through the same process it was originally sent.
Tip: Scenario #2 – Sending Link via Invoice (Not Posted)
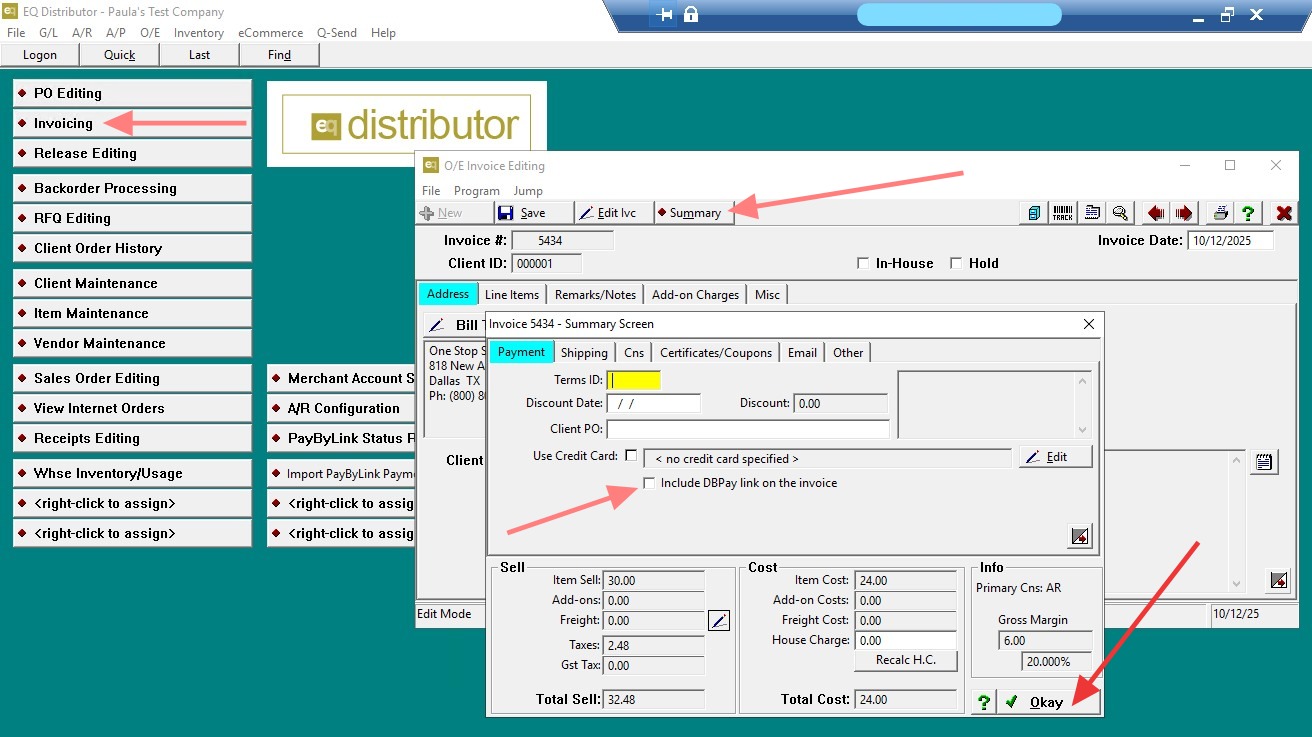
29. - Open Invoice
-
Go to Invoice Editing > Edit Mode.
Check Link Settings
-
Go to the Summary tab.
Ensure the box “Send Link” is checked.
-
If Links on Invoices (on the OE Invoice tab) is set to Optional, this box will be unchecked automatically.
Click Okay to save.
-
-
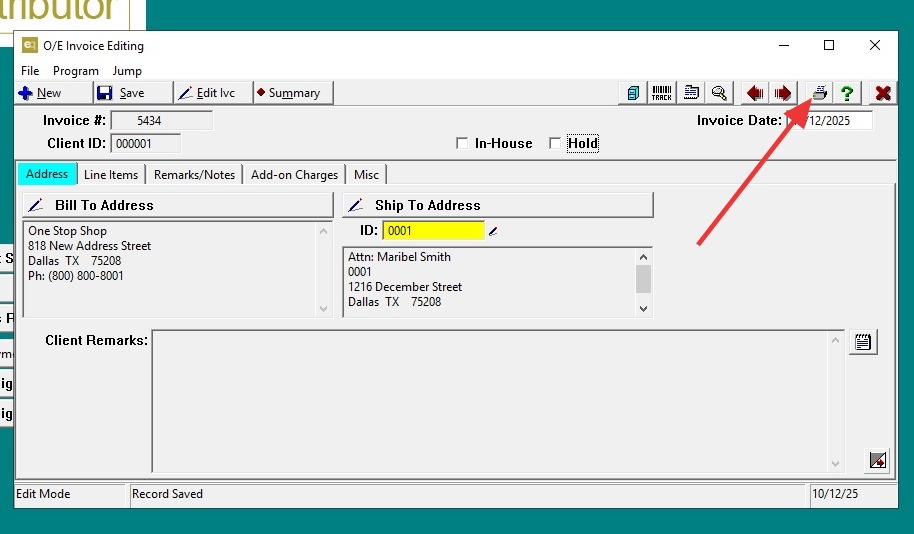
30. Print Preview to send.
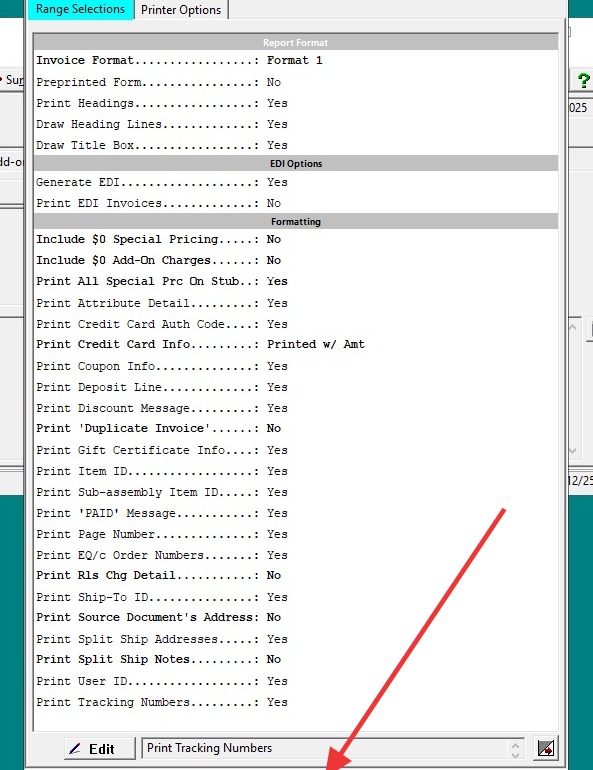
31. Click "Send"
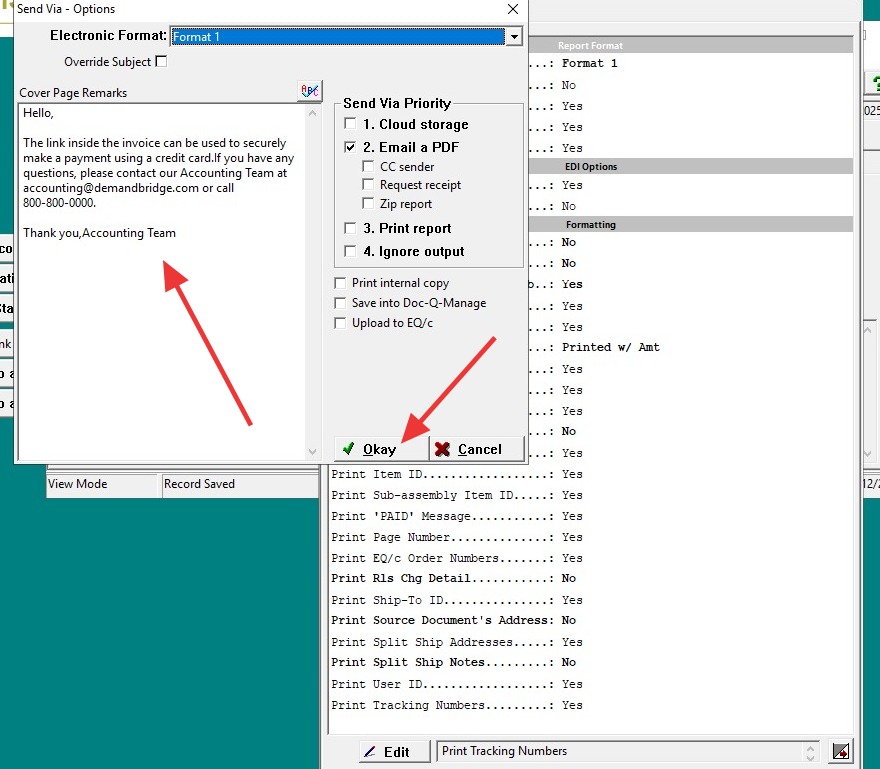
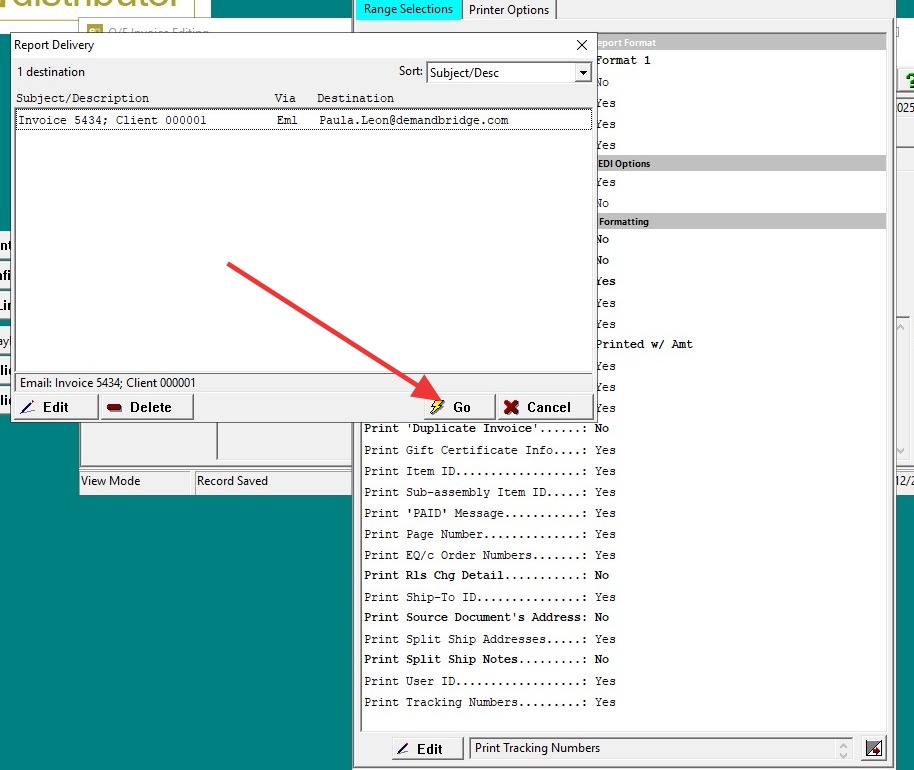
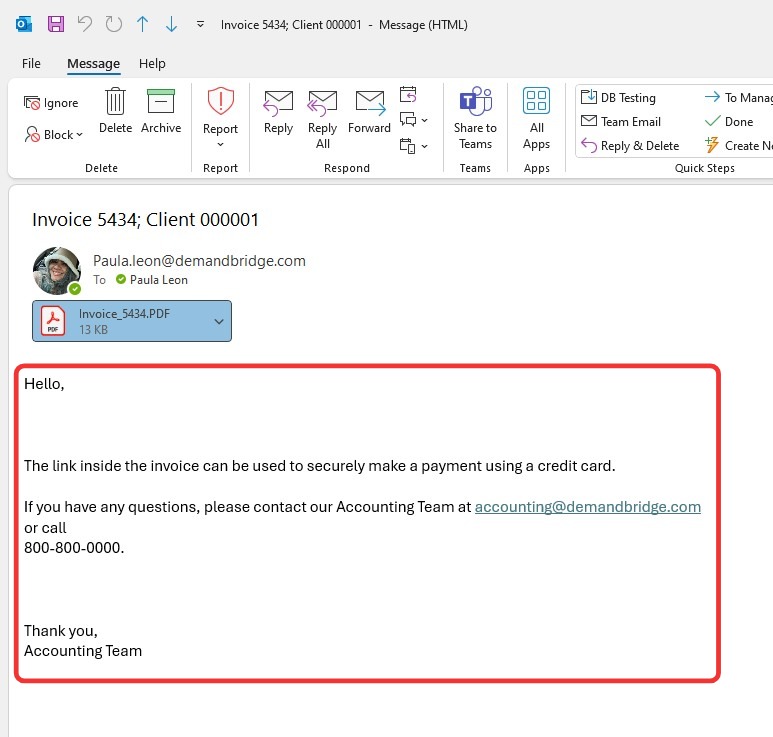
32. - The email verbiage that appears when sending the invoice must be configured in this section.
- This section controls the salutation part of the email.
- The PayByLink will be included in the actual invoice.
- The link displays based on your PayByLink settings.
33. Click "Go"
34. Click "Begin"
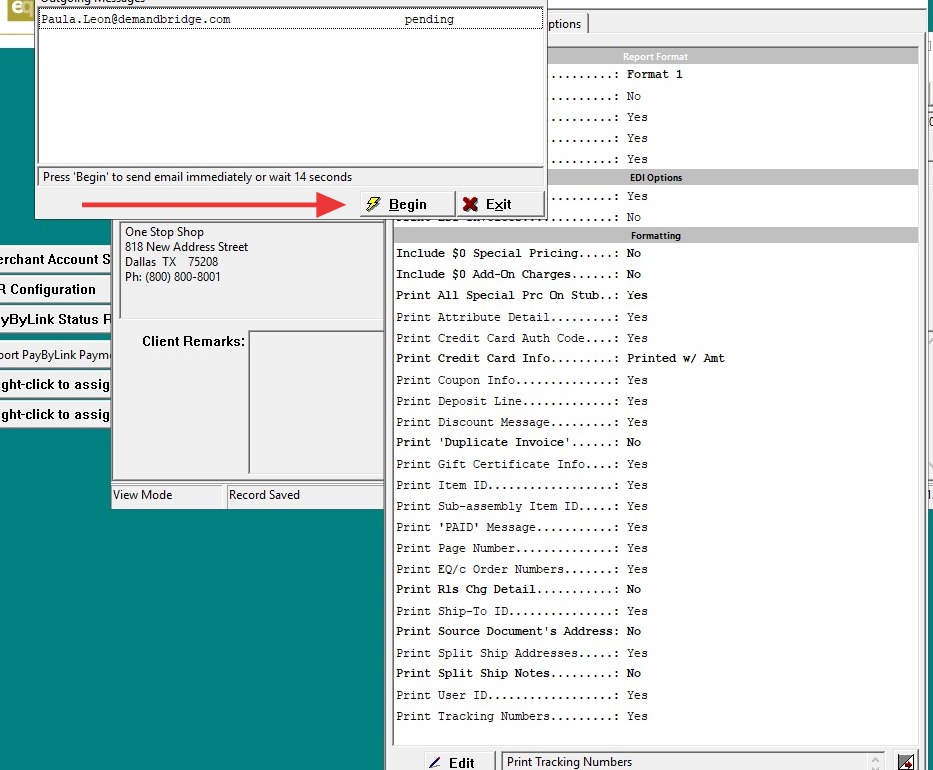
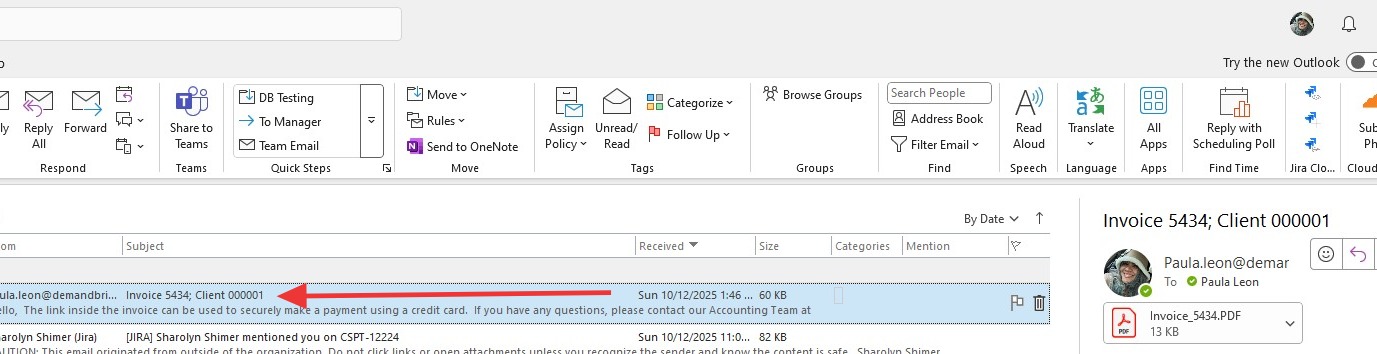
35. ### Sending Email
- The email will be sent to the client and pulls from the email set up under Client Maintenance with Invoice checked.
- The email will include the invoice, with the PayByLink included in the invoice itself.
36. ### Email Verbiage
- The email verbiage is unique and will remain once set unless you change it.
37. ### Invoice Link Display
- The invoice link displays based on the OE Invoice tab settings (font, color, and borders).
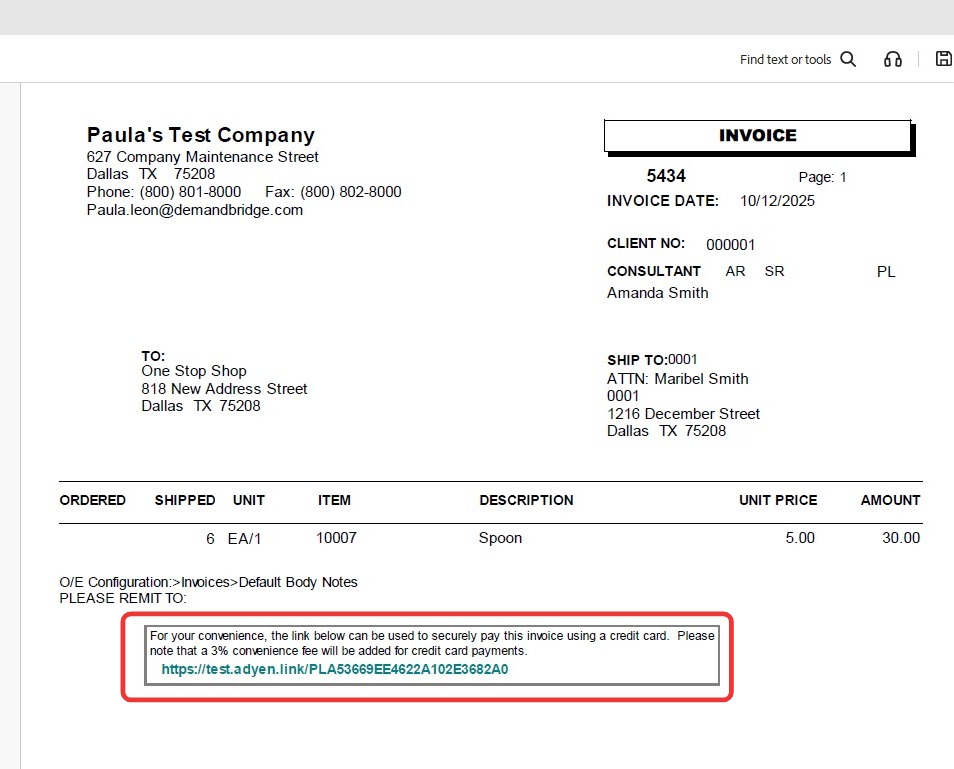
Tip: Note: Payment creates receipt. Once invoice posts, receipt is applied & invoice paid
Tip: Scenario #3 – Sending Link via PO (Prepayment on PO)
38. Go to PO Editing and open the PO. In the Address tab, click Edit Mode, then select Credit Card
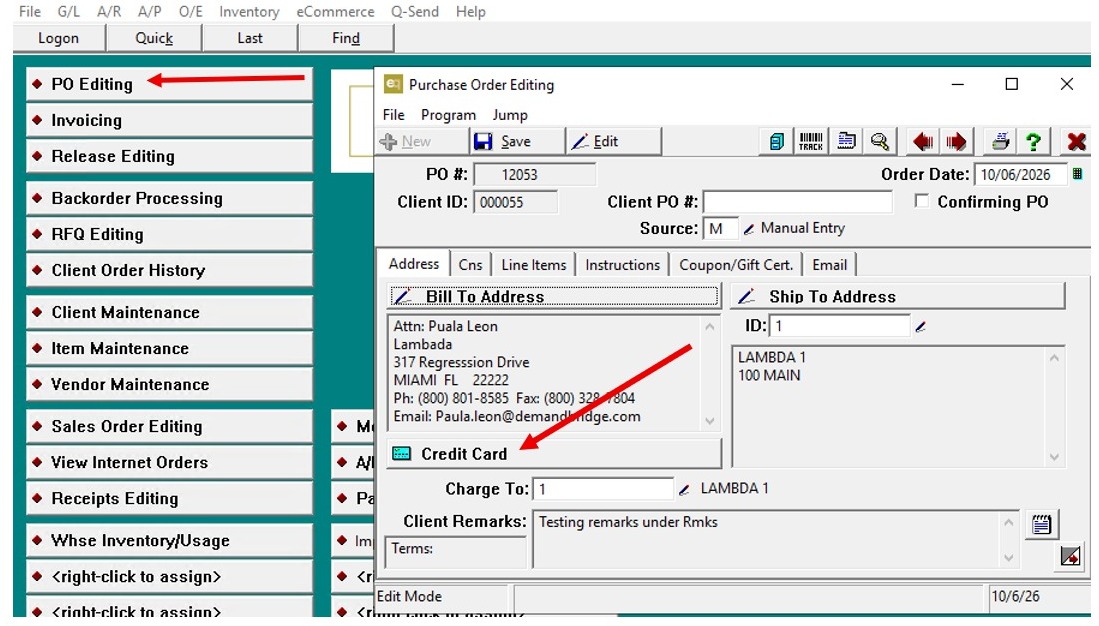
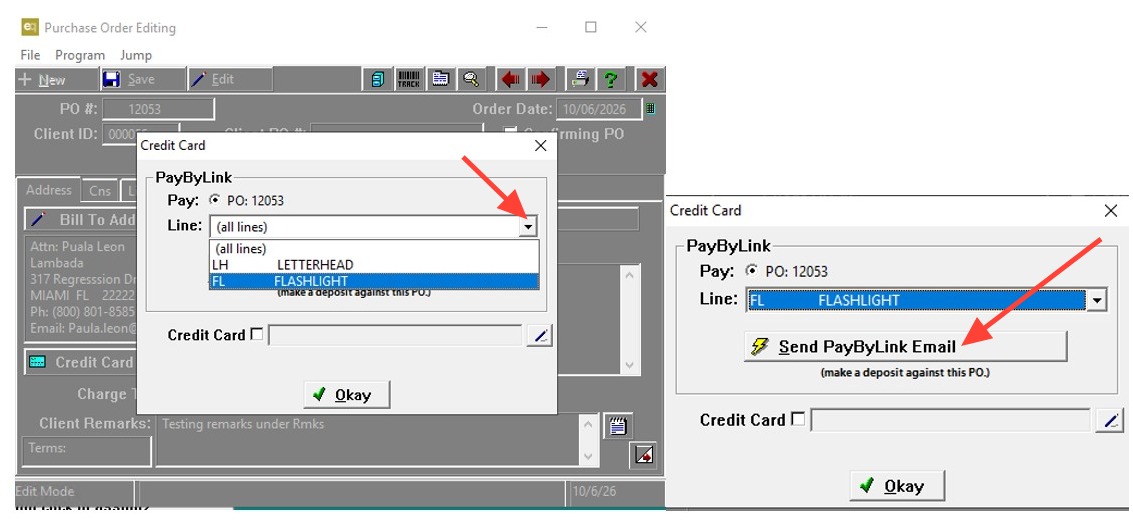
39. The Credit Card box opens with Pay By Link and the PO already selected (PO 12053 in this example).
Use the drop-down to choose what the deposit is for:
- All Line Items: request a deposit on the whole PO, or
- A specific line item: request a deposit on one item only.
In this example, we selected line item FL (Flashlight).
Click Send PayByLink Email, then click OK.
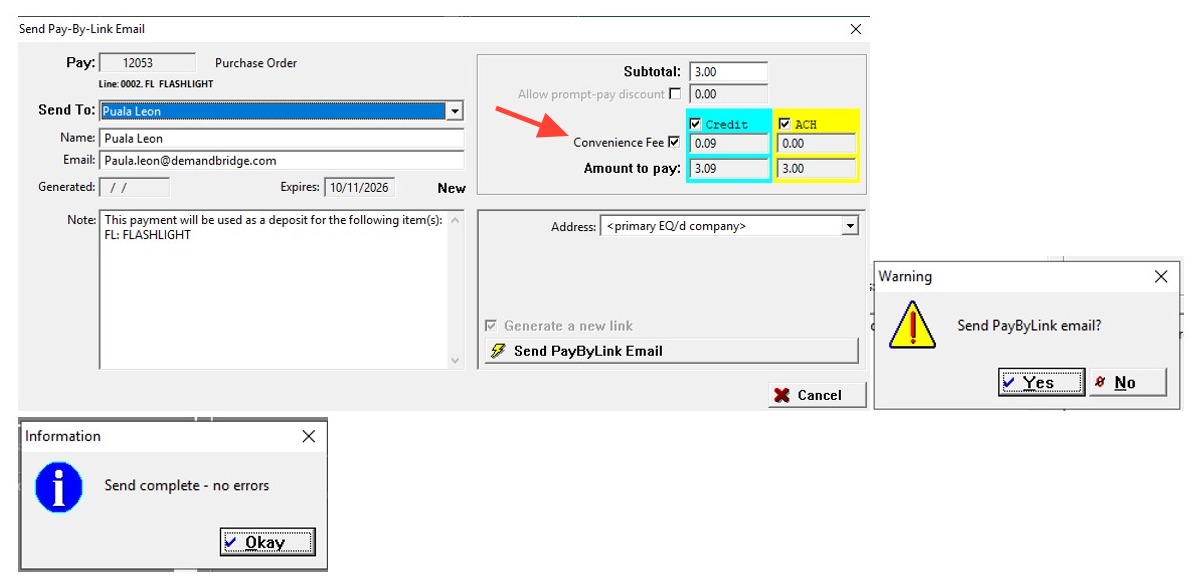
40. This screen lets you review and adjust the link before sending:
- Payment Method: Choose Credit Card, ACH, or both.
- Convenience Fee: Uncheck it if you don't want to charge it.
- Send To: The email pulls from the client's contacts. You can change it if needed.
- Notes: Shows the item you're requesting a deposit on.
Click Send PayByLink Email. Click Yes to confirm, then click OK when the send is complete.
41. The client receives an email with the subject line "Online Payment for PO12053." The email lists the PO number, the line item being paid, and the option to pay by credit card or ACH.
42. Enter the credit card information and click Pay.
Note:
The credit card information shown in this sample is a dummy number used for demonstration purposes only. It is not a real credit card number.
Tip: Note: Payment creates receipt. Once invoice posts, receipt is applied & invoice paid
Tip: Deposit on a Release
You can also request a deposit on a Release. The release must be distributor-owned. Go to Release Editing, then follow the steps for putting a deposit on a PO.