
DBD: Bank Reconciliation
The Bank Reconciliation (B/R) system automates and simplifies matching your monthly bank statement to your General Ledger. By integrating directly with Accounts Receivable (deposits), Accounts Payable (checks), and the General Ledger (Chart of Accounts), the system automatically references posted transactions and amounts to help you easily spot data entry or bank errors.
Key Terminology
Before beginning your reconciliation, it is important to understand how the system manages balances and tracking metrics:
- Bank Statement: Received after your fiscal period ends. Because the closing date may not align perfectly with your period end date, timing differences will naturally occur between the bank and your general ledger.
- General Ledger Cash Account: Reflects all cash-impacting activity across modules. Only activity updated via the G/L Transaction Update will reflect here. Always run this update before reconciling.
- Working Totals: Located on the Bank Statement Data entry screen. After you enter your statement summaries, the system establishes "working totals." As you clear checks and deposits, these totals reduce. Once everything is accounted for, they will drop to zero.
-
Check Digits: These track the total number of transactions (checks/deposits) that have cleared. Like working totals, they decrease as items are cleared.
Note: If some transactions were entered as manual Journal Entries rather than checks/deposits, these digits might not hit absolute zero. This does not mean you aren't reconciled; they are simply a guiding tool.
Part 1: Initial System Setup (One-Time)
These setup steps must be completed in sequence before processing your very first bank reconciliation.
Enable the Integration Parameter
- Navigate to Accounts Payable > System > System Setup > Parameters.
- On the second screen, check the box "Is there automatic check reconciliation?".
Configure Bank Account Parameters
All bank accounts set up in A/R and A/P automatically sync to B/R. You only need to answer two historical questions for each account:
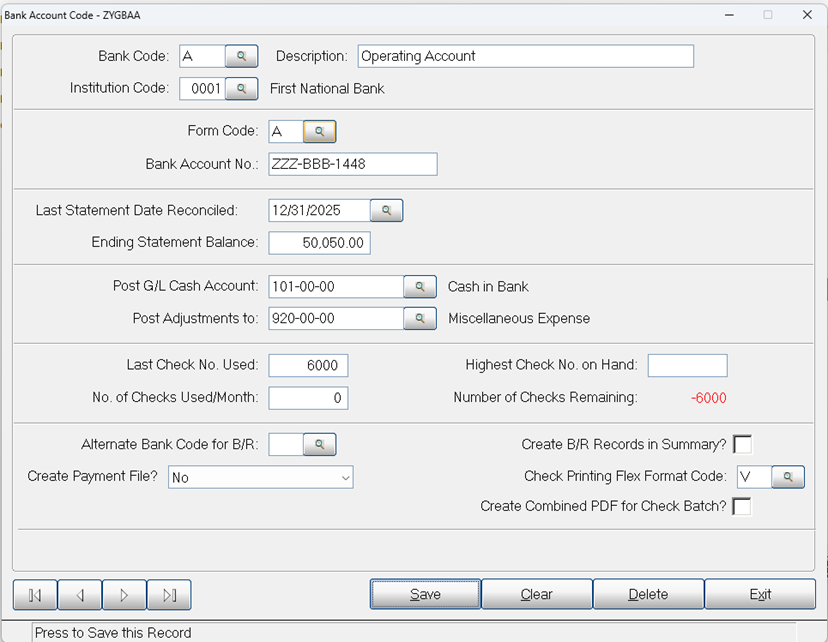
- From the B/R menu, select Bank Account Maintenance.
- Enter your Account Code.
- Navigate to Last statement date reconciled and enter the date of your last historical statement.
- Navigate to Ending statement balance and type the ending balance of that same statement.
-
Click Save and Exit.
Set System Parameters
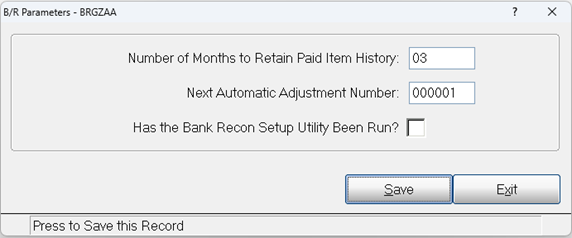
- From the B/R Setup folder, select Parameters to open the configuration screen.
- Number of months to retain paid item history: Enter the duration to retain cleared items (typically
1month is sufficient if you maintain external reports, but increase this if you use custom reporting tools like BERT). - Next automatic adjustment number: Type a 1-to-6-digit starting number to isolate and identify automatic journal entries originating from B/R.
-
Click Exit.
Load Historical Disbursement Data
This utility imports existing data from Accounts Payable.
⚠️ Critical Warning: This utility should only be run once during initial setup. Running it after active reconciliation has begun will overwrite your data.
- Change your system Accounting Date to the first day of the month you are actively reconciling (e.g., if reconciling October 31, set the date to October 1).
- From the B/R Setup folder, select Automatic Disbursement.
- Select Proceed. The program will automatically mark checks dated prior to that accounting date (up to 90 days back) as "cleared."
- Optional: If you have outstanding checks older than 90 days, add them manually using the Detail Inquiry Utility (requires administrative security access).
Part 2: Reconciling Your Bank Statement
Step 1: Loading Information from Your Bank Statement
- Navigate to Bank Reconciliation > Processing > Bank Statement Data.
-
Enter your Bank Code to open your active worksheet.
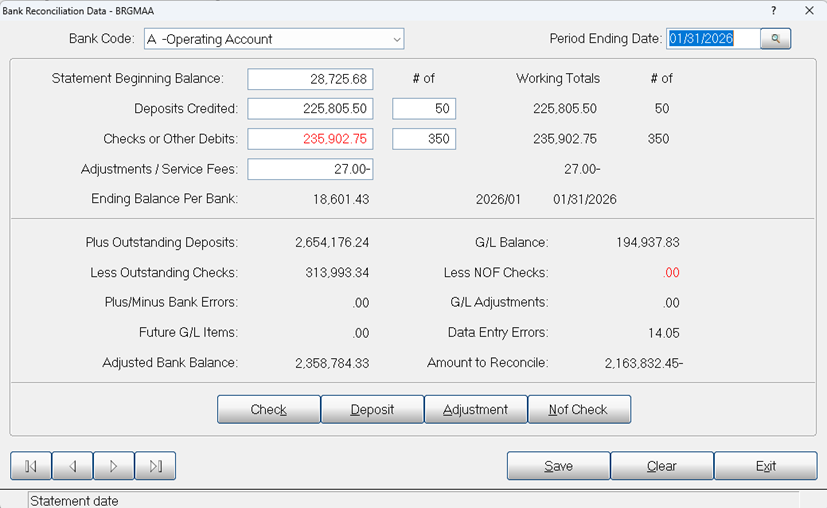
Complete the following fields exactly as they appear on your physical bank statement summary:
- Period End Date: The closing date of the statement.
- Statement Beginning Balance: Defaults to the prior month's ending balance.
- Deposits Credited: The total dollar amount of deposits processed by the bank.
- # of (Deposits): The total count of deposit transactions (acts as your check digit).
- Checks and Other Debits: The total dollar amount of checks/debits.
- # of (Checks and Debits): The total count of check/debit transactions (acts as your check digit).
- Adjustments / Service Fees: Enter bank fees. Use a negative sign (
-) for bank charges/debits, and a positive sign (+) for bank credits. - Ending Balance per Bank: This automatically calculates based on your inputs. Verify that this matches your physical statement exactly.
Step 2: Clearing Transactions
Once your summary is saved, use the bottom action menu to clear specific items against your records:
Clearing Checks
Select Check from the action menu. You can clear items using three methods:
- Individual Check: Type the exact check number and click save.
- Sequential Review: Press enter on a blank field to review the next sequential uncleared check.
- Range of Checks: Select the range option to clear a block at once.
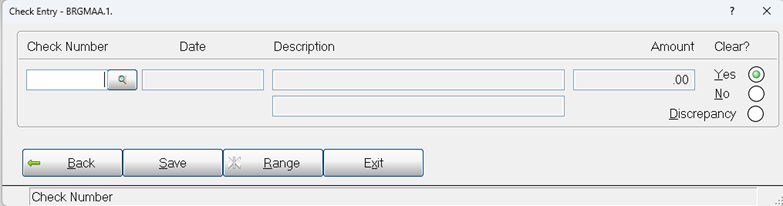
For each item, select:
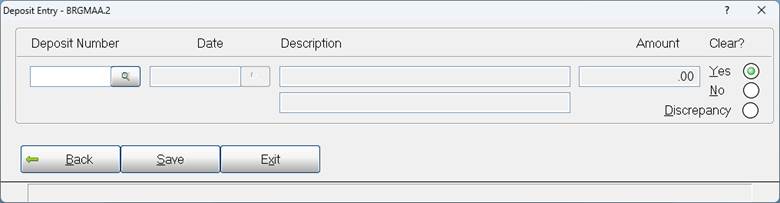
- Yes: If the check appears on your bank statement (cleared).
- No: If the check is missing from the statement (remains outstanding).
- Back: To return to the previous entry.
🛠️ Handling Amount Discrepancies: If a check or deposit amount doesn't match the system record:
- Click the Discrepancy button.
Enter the exact amount the bank paid.
At the Is this a bank error? prompt:
- Select Yes (Y) if the bank made the error. The system holds this in a discrepancy field for you to resolve with your banking institution.
- Select No (N) if it was an internal data entry error.
💡 Accounting Guideline: If an internal entry variance is immaterial, post a journal entry adjusting it to miscellaneous expense/revenue. If it is material, reverse and correct the original transaction through A/P or A/R.
Clearing Deposits
Select Deposit from the action menu and click Query to view outstanding deposits synced from A/R Cash Receipts. Mark them Yes, No, or Discrepancy using the same methodology as checks.
Step 3: Handling Adjustments & Missing Items
Adding Quick Adjustments
If you discover a necessary adjustment (like an automated insurance draft or service fee) during reconciliation, you don't need to exit the screen:
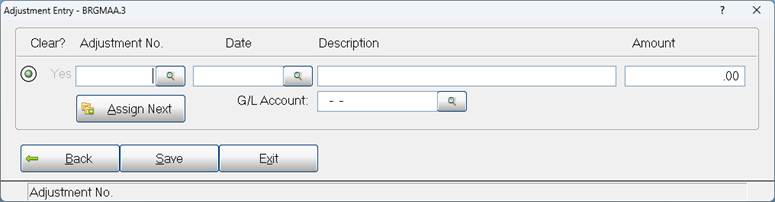
- Click Assign Next to generate a new adjustment number.
- Complete the description and date.
- Enter the amount. (The system automatically assumes the first half of the entry applies to your G/L cash account, so use a positive number to debit/increase cash and a negative number to credit/decrease cash).
- The offset account defaults to your Bank Account Maintenance settings; override this field if a specific expense account is required.
Not on File (NOF) Items
If a check or deposit cleared the bank but was never processed in DBd:
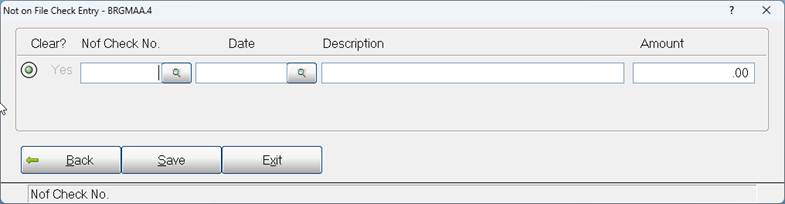
- Select NOF Check from the menu.
- Enter the NOF Check No (up to 9 digits), Date, and Description.
- Enter the Amount (use a positive value for checks; use a negative value for deposits).
⚠️ Note: NOF items are for tracking on reconciliation reports and do not automatically update your sub-ledgers. You must still manually enter them into A/P, A/R, or via a General Ledger Journal Entry to correct your books permanently.
Step 4: Resolving Differences
Once all statement information is logged, your Working Totals should drop to zero. If they do not, or if an Amount to Reconcile remains, cross-reference using this checklist:
- [ ] Run the Bank Reconciliation Report (B/R-P2) with paid items detailed to ensure all entries have the correct positive/negative sign.
- [ ] Verify that all check runs and deposit batches for the period were fully posted and updated.
- [ ] Ensure you ran the G/L Detail Transaction Register after all sub-ledger updates were finished.
Step 5: Printing and Updating
To permanently archive your cleared data and push your adjustments to the General Ledger, you must run the update utility.
- From the main B/R menu, select Print the Reconciliation Report and Update.
- Set your Report Options (Toggle Print detailing of PAID items? to Y for a full history, or N for an outstanding-only view).
- Before finalizing, double-check your Output Options on the selection screen to ensure the correct printer or PDF device is selected.
- Print Report.
- At the final system prompt, confirm the update. The system will archive the paid data and push generated adjustments to your G/L.
- Final Step: Switch to your General Ledger (G/L) system, select option U1 (G/L Detailed Transaction Register), and print/update the register to finalize the balances on your financial statements.