
DBD: Customer Invoicing Gateway (CIG) Batch Import and Layout
The Customer Invoicing Gateway (CIG) automatically receives fulfillment files from your local shipping stations (such as UPS WorldShip or FedEx Ship Manager). This data automatically creates customer invoices in DB Distributor, billing the customer for freight and updating order tracking without manual data entry.
1. Automated CSV File Directory & Backup Behavior
The input file for this module must be a standard .csv file format.
- File Directory: Shipping station files must be dropped into the specific directory configured in your system parameters (typically
/usr/lib/pvx/ship_in). - File Naming: The gateway looks for files named
default*.csv(e.g.,default.csv). - Backup Automation: Once successfully processed, the system automatically appends
.buto the original filename (e.g.,default.csv.bu) to safely archive the historical data.
2. Standard default.csv Data Field Layout
To import successfully, the shipping station's exported CSV file must strictly align with the following 17-field mapping structure. Empty columns must be represented sequentially by successive commas (,, ).
| Field # | Field Position / Description | Requirement | Notes / Validations |
| 1 | Shipment Information / Collection Date | Required | Formatted as YYYYMMDDHHMMSS |
| 2 | Package / Weight |
|
Total box weight |
| 3 | Package / Weight |
|
Duplicated weight field verification |
| 4 | Package / Reference 1 |
|
Contains the system Ship-To Code |
| 5 | Package / Reference 2 | Required | Must be a valid Order Number (exactly 8 alphanumeric characters, no hyphens) |
| 6 | Package / Tracking Number | Required | Raw carrier tracking string |
| 7 | Package / Void Indicator |
|
Y or N flag |
| 8 | Shipment Information / Service Type |
|
Carrier ID mapping |
| 9 | Package / Package Published Charge | Required | Freight amount to charge |
| 10 | Third Party / UPS Account Number |
|
Third-party billing account if applicable |
| 11 | Shipment Information / Hundred Weight |
|
Bulk rating flag |
| 12 | Package / Additional Handling Charges |
|
Accessorial published carrier fees |
| 13 | Shipment Info / Total Shipment & Handling | Required | Combined freight billing amount |
| 14 | Package / Dry Ice Charge ABR |
|
Not used; must be present as an empty column |
| 15 | Package / Dry Ice Charge CCC |
|
Not used; must be present as an empty column |
| 16 | Ship To / Country or Territory |
|
Example: United States |
| 17 | Ship To / Receiver UPS Account Number |
|
If populated, automatically replaces Field 10 |
Raw File Example Snippet
Plaintext
"20170823160927","2.7","2.7",,"06A01T9J","1Z123456762648229","N","U","9.80",,"N",,"9.80",,,"United States",
"20170823160927","3.1","3.1",,"05A01T97","1Z123456762205439","N","U","8.77",,"N",,"8.77",,,"United States",
3. Step-by-Step: Processing a CIG File Import
Navigation Path: DB Distributor Optional Modules > Shipping Management > Customer Invoicing Gateway > Processing > Import Invoicing Information
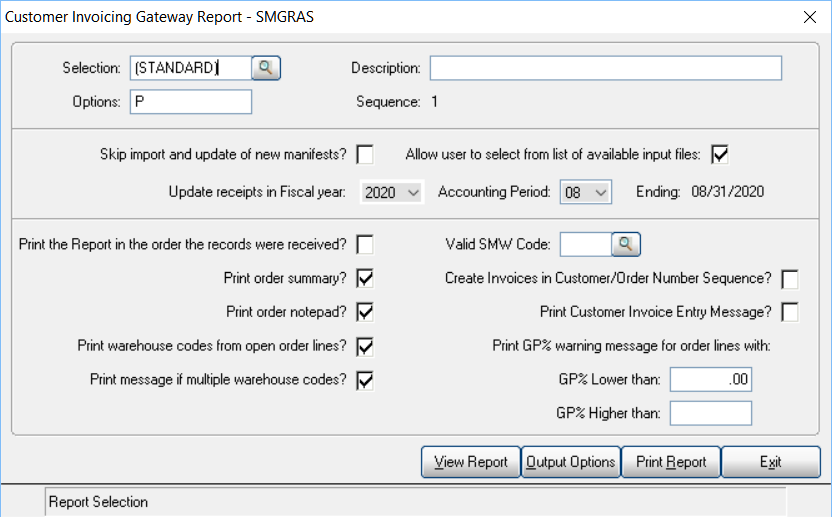
- Set Processing Options: In the Options field, type P.
⚠️ Critical Flag: Entering P is required to prevent the system from executing an unintended Purchase Order Receiving process against a Sales Order.
- Verify Period: Confirm or change the Update receipts in Fiscal Year and Accounting Period fields to match your current active financial tracking month.
- Configure Output: Click Output Options to verify and select the correct physical printer or system PDF device. Save your device parameters and return to the main selection screen.
-
Enable File Selection: Check the box next to Allow user to select from list of available input files.
Execute Import: Click Print Report. This imports the raw text data and generates your official Customer Invoicing Gateway Journal.
Manage Batches: If prompted by batch processing constraints:
- Select an existing open batch, OR
- Select Yes to generate a new batch. If creating a new batch, fill out your batch descriptions and click Save.
-
Select File: Choose your target
default*.csvfile from the pop-up listing window and click Proceed.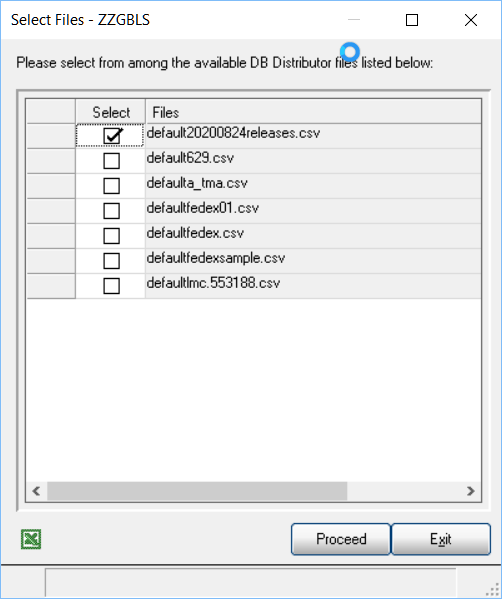
- Clear Staging: Once your journal prints cleanly, the system will prompt: "Clear All Entries?". Select Yes to clear down the import staging file.

4. Finalizing Invoices and Posting
🛑 Note: If the explicit invoicing function of your Customer Invoicing Gateway is disabled in your global company parameters, your processing tracking is complete. If it is enabled, execute the billing cycle below:
- Print Invoices: Open your billing queues and select the exact processing batch you imported above.
- Verify Device: Use Output Options to confirm your printing target, then click Print Report.
- Form Alignment: Select No to skip the form alignment pattern loop.
- Confirm Layout: If your invoices print correctly without text shifts, reply Yes to the completion prompt.
- Audit Changes: If any transaction discrepancies, incorrect freight values, or weight variances are discovered on the printed copies, navigate directly to Accounts Receivable > Invoice Entry to perform required edits.
- Post to General Ledger: Print your standard Sales Journal and select Update when ready to permanently distribute the entries downstream to your financial statements.