
DBD: Cash Receipts 4 - Payment Distribution Methods (Level 3)
With your overall deposit established (Level 1) and your individual customer check amounts logged (Level 2), you enter the final operational layer of the cash receipts cycle.
This guide covers Level 3: Payment Distribution Methods, detailing how to manually allocate funds, handle freight and sales tax shortfalls, and leverage the four automated batch-distribution engines.
The Purpose of Level 3 Entry
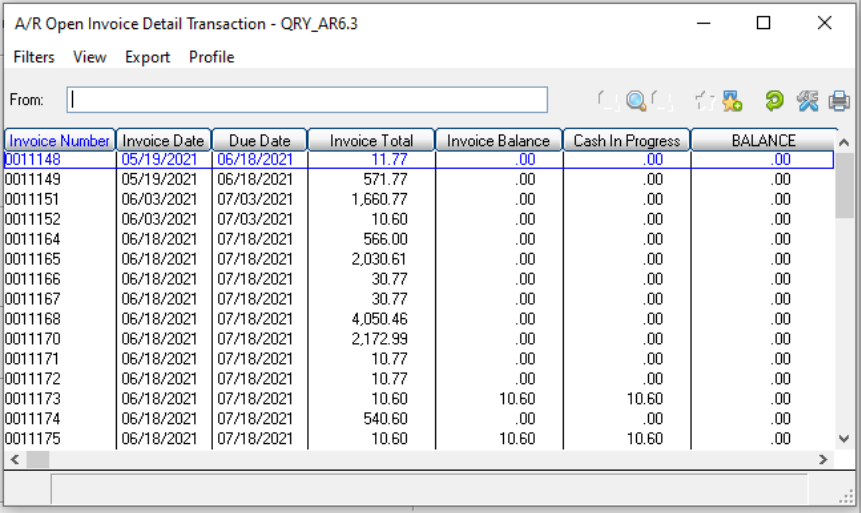
Level 3 is the allocation layer. For every check confirmed at Level 2, you must instruct the system exactly which open liabilities across your active Accounts Receivable tables (AR6 ) are being settled.
Your Distribute Balance decreases dynamically as cash is applied. To ensure ledger balancing, a check must be distributed to zero before you can proceed to the next customer item.
Method A: Automated Distribution (Auto Distribute )
If a customer is paying dozens or hundreds of invoices simultaneously, click the Auto Distribute button to open the batch allocation matrix.

The system provides four different methods:
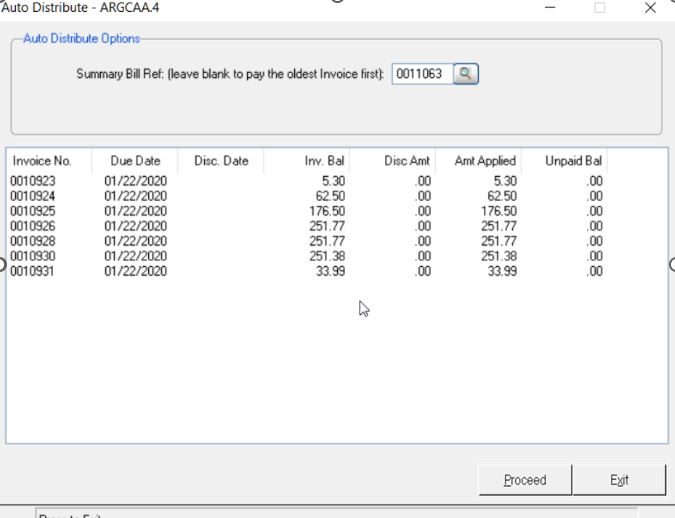
1. Summary Bill Invoice Matching (Most Common)
- When to use: When an Items Management customer sends a single check to settle a consolidated monthly invoice statement.
-
Workflow: When you see the following screen, click Proceed. If no range is entered at this point (First to Last), the program will go into the prompting for the "regular" Auto Distribute feature.
- Type the exact consolidated statement number into the Summary Bill Reference Number field and click Proceed. When using the Summary Bill option, the option to apply to credits is not available. Once the distribution is complete, click Exit.
- ⚠️ Data Entry Rule: You must include any leading zeros (e.g.,
001234) exactly as configured during the billing run, or the distribution engine will fail to locate the invoice bundle. - Note: When utilizing the Summary Bill option, the tool to automatically add credits is disabled.
2. Pay Oldest Invoices First
- When to use: When a customer sends a round-dollar check without a remittance stub, or when they are paying off their entire outstanding balance.
- Workflow: When you see the following screen, click Proceed. If no range is entered at this point (First to Last), the program will go into the prompting for the "regular" Auto Distribute feature.

- Bypass the Summary Bill field entirely. Toggle the Add all Credit Memos checkbox to Yes if you wish to inject open credit balances into your active cash pool before the sweep occurs. Click Proceed.
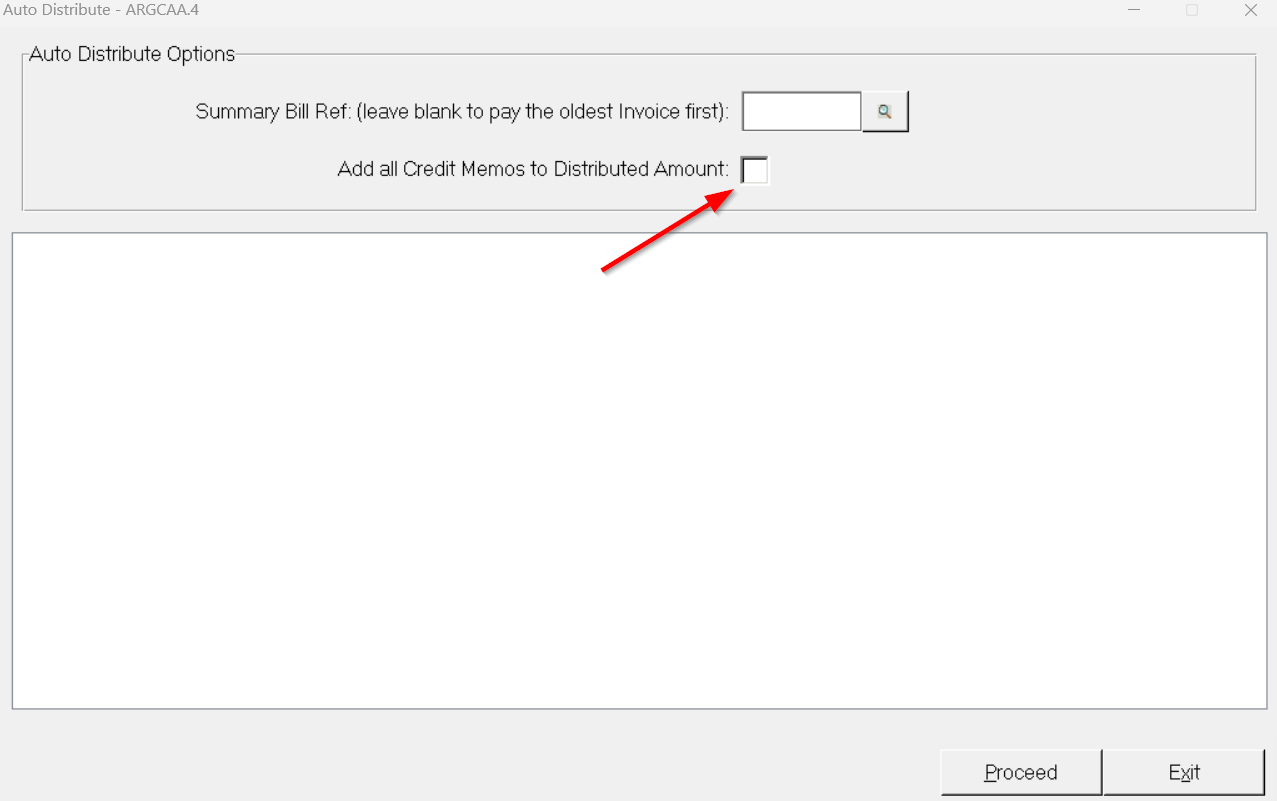
- System Behavior: The system systematically applies cash down the ledger row, starting with the oldest aging bucket until the check value is exhausted. If the funds run out mid-row, the final invoice processed will receive a partial payment, leaving the residual balance open.
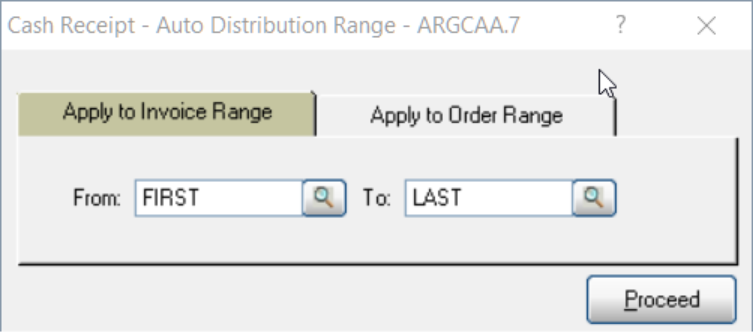
3. Apply to an Invoice Range
- When to use: When a customer pays a sequential block of invoices.
- Workflow: Select the Invoice Range tab. Use the system query button to view available open invoices, or manually input a starting and ending invoice boundary, then click Proceed.
- Note: This option is strictly visible if enabled in your corporate A/R system parameters.
4. Apply to an Order Range
- When to use: When a client tracks payments against internal procurement numbers rather than your system billing numbers.
- Workflow: If an Order number range is entered, this will work like the Invoice number range. The program will read the open invoice file (AR6) using an alternate key by customer/order number to find the open invoices within that range of order number.
In all situations using the Auto Distribution, if the client did not provide enough funds to cover all invoices in the range selected, the last invoice will display an unpaid balance. You may wish to do some research prior to updating the Cash Receipts journal to determine the reason. It could be a situation where another invoice in this range should not have been selected or perhaps the intent was a short payment on another invoice. You can go to the specific invoice selection and redistribute these funds if needed.
It is possible to use a combination of invoice selections during the Cash Receipts process.
Please note, you may wish to use the Invoice selection option to select a specific Credit Memo, as in the case of a prepayment. Then go back and use the Auto Distribute option by Order number to easily locate the appropriate invoice.
Method B: Manual Single-Invoice Allocation (Invoice Entry )
When you need to hand-select individual invoices or explicitly manage line-item variances, click the Invoice Entry button and use the query tool to draw up the customer's open ledger.

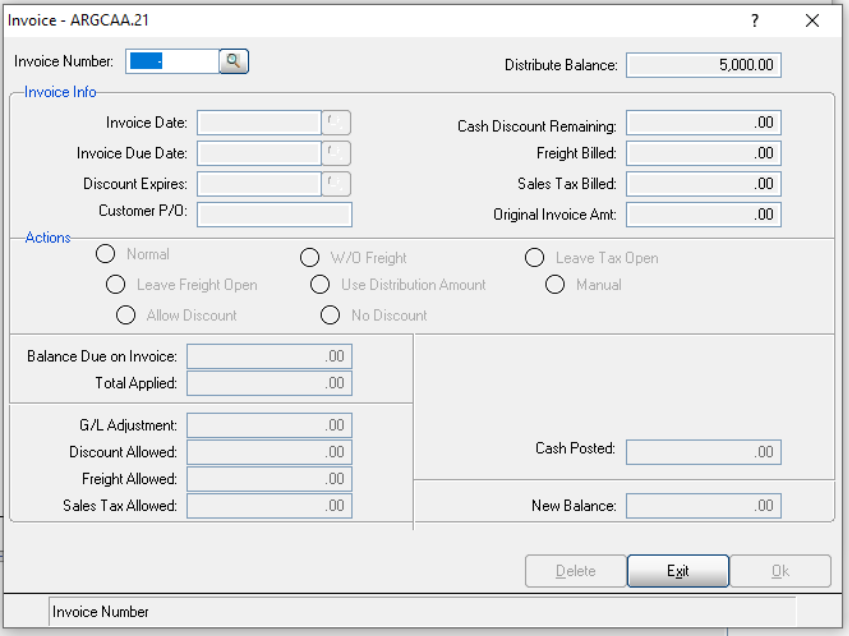
Use the query button to look up all the open invoices for this customer and choose from the list.
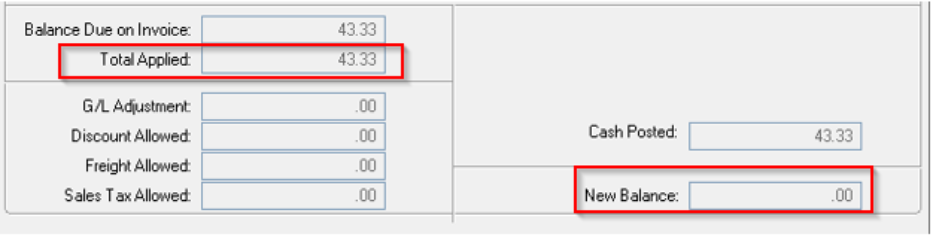
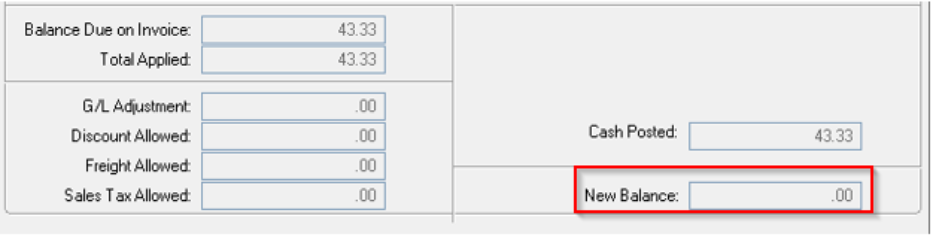
Simply double click on the appropriate invoice or enter if it is already highlighted. The following panel will appear. Note information regarding freight, discounts and sales tax are shown.
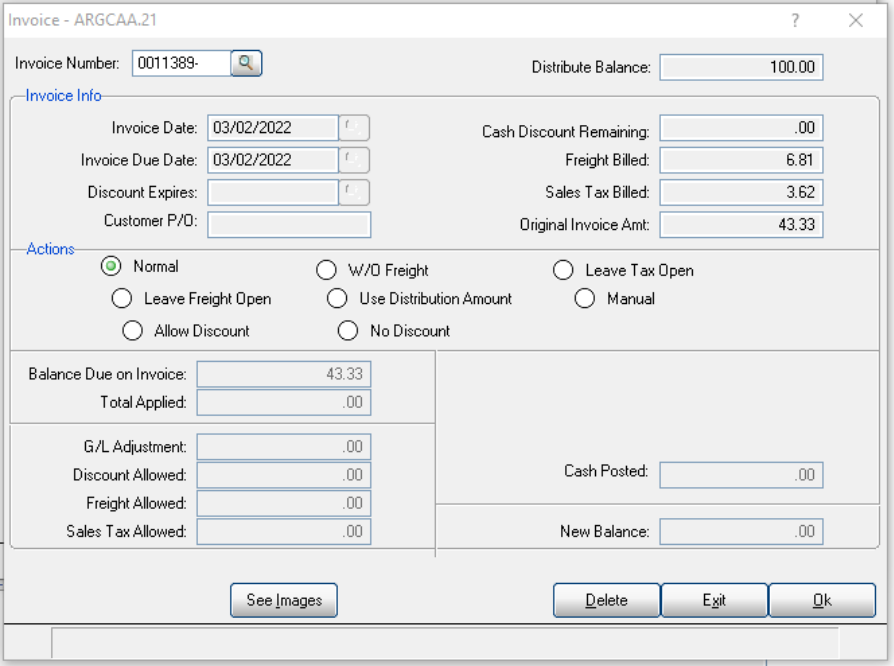
The following actions can be performed by clicking on the applicable radial button. The above invoice had a balance of $43.33. The results of each radial button are displayed following the explanation.
Please note that you can also apply credit memos to open invoices. First you would enter the credit memo number in the invoice number field. Click the Normal radial button. This will add the credit amount to your Distribute Balance. Then you can select the invoice(s) against which you would like to apply the credit balance. If you were applying credits against invoices without entering any actual cash payments, you would enter a 0.00 in the deposit and/or check amount field.
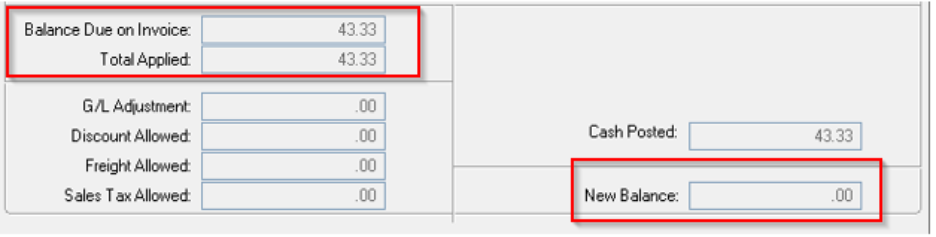
Allow Discount
This action assumes that you are going to pay the invoice in full, except that you are allowing an expired discount.
No Discount
This action assumes that you are going to pay the invoice in full and that an allowable discount was not taken by your customer in their payment. Since the discount has expired in this example, the results would have been the same as in Normal above.
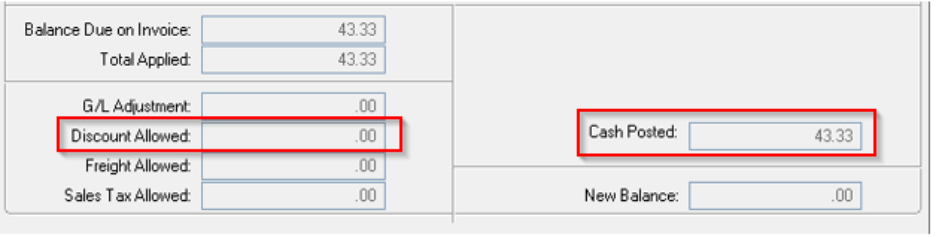
Write Off Freight
This assumes that the customer has paid the invoice short of the freight amount and you have decided to write off the freight. If you report commissions at the time of collection, this write-off will be reflected on the commission’s payable report.
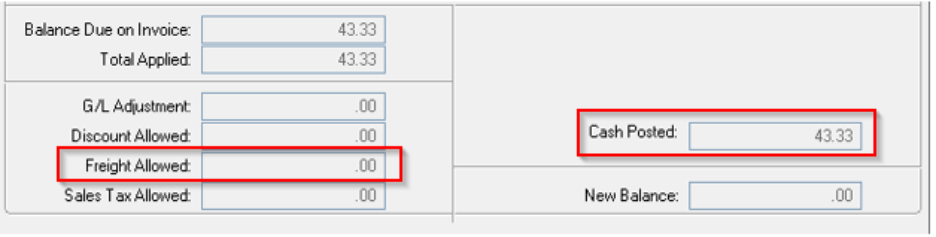
Leave Freight Open
This assumes that the customer has paid the invoice short of the freight amount and you plan to subsequently collect his amount. The invoice balance will be the amount of the freight.
Leave Tax Open
This assumes that the deposit is short by the amount of the sales tax and you wish to leave this balance open until you can enter a credit for the sales tax. This is the preferred method, as your credit will update to the sales tax payable report.
Use Distribution Amount
This assumes that you wish to take the distribution amount and apply it in full against this open invoice.
Manual Entry
If a customer pays an invoice short (e.g., sending $725.00 for a $725.08 balance) and you wish to settle the invoice completely and write off the variance:
- Select the Manual radial button.
- In the Total Applied field, type the full invoice balance (
725.08). -
In the Cash Posted field, type the actual remittance received (
725.00).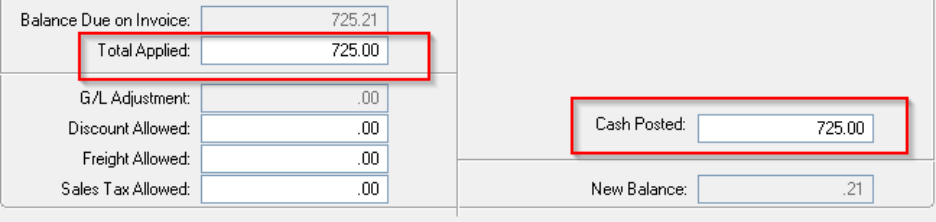
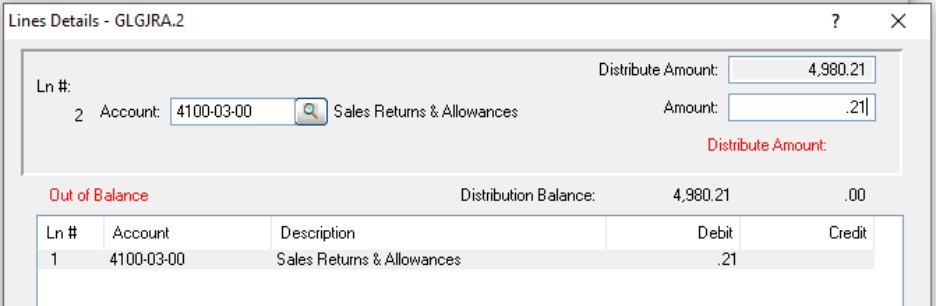
Click OK. The system will trigger a validation alert:
Total Applied is out of Balance.Click OK on the alert to unlock two emergency action tools:
- Re-Enter: Clears your inputs so you can fix a typing error.
- GL Adj: Opens a direct posting window allowing you to route the remaining variance (
$0.21) straight into an Allowance Account or your corporate write-off general ledger string.

Please note that you would use the same procedure to write off an invoice in full. Simply enter the invoice number to be written off, choose the Manual radial button. Enter the entire invoice amount in the Total Applied field, enter zero in the Cash Posted field. Just as before, a message will display that the Total Applied is out of Balance. Click the GL Adj button to post the entire amount to your Allowance for Doubtful Account or any other account of your choosing.
Method C: Special Allocation & Account Handling Tools
Directly alongside your standard invoice matching engines, the Level 3 panel provides four specialized cash-routing buttons. Use these tools when handling ambiguous remittances, advanced customer deposits, or non-A/R general ledger funds.
1. Pre-Pay an Invoice (Pre-Pay )
- When to use: When a customer sends a deposit or down payment tied to a specific order before an official invoice has been generated by a Sales Journal run.
- Workflow: Click the Pre-Pay button. The system will prompt you for an Order Number (an 8-character field) instead of a standard 7-digit A/R invoice number.
- System Action: This process creates an open credit invoice in the customer’s A/R record, uniquely identified by your order number. It will use today's system date as the document date.
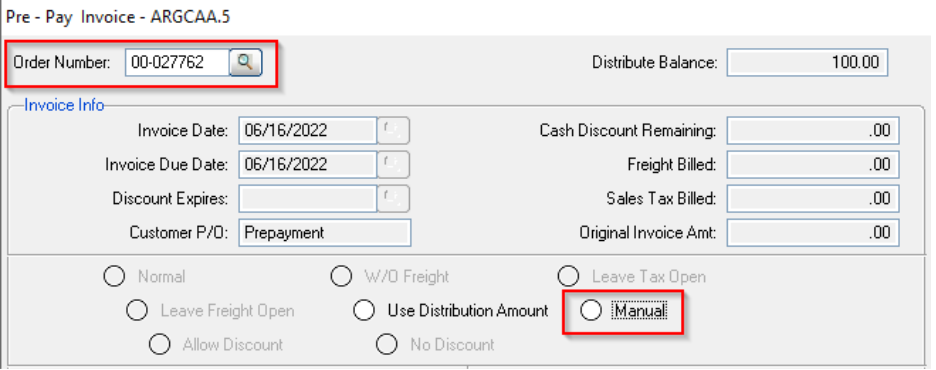
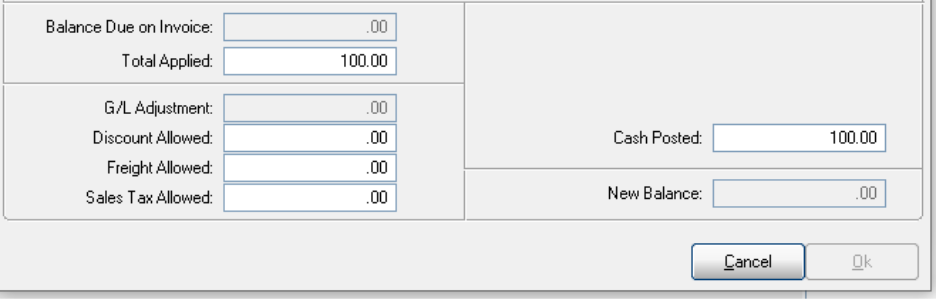
Notice that we are now prompted for an order number instead of an actual invoice. You can use the query option to select an order number or you can key in a number, this will become your prepayment invoice number. Notice that you only have two options here. If you choose the ‘Use Distribution Amount’, the full amount of distribution will be posted to this order/invoice number. If you use the Manual radial button you would then enter the Total Applied and Cash Posted that you wish to apply to this order/invoice number. The manual option allows you to setup more than one entry.
This process sets up a credit invoice in this customer’s accounts receivable records that is identified by your order number.
We would use the Distribute to GL button, if we wish to post the entire Distribute Balance to a GL account as opposed to posting it against an open invoice.
2. Put on Account (Put On Acct )
- When to use: Use this option when a customer check arrives with an overpayment, or when you are completely uncertain how to apply their remittance and need to safely park the funds while researching.
- Workflow: Click Put on Account. The system will automatically take your remaining unapplied Distribute Balance for that check and hold it as an open credit on the customer's account master file.
3. Use on Account (Use On Acct )
- When to use: When a customer instructs you to apply an existing credit balance (or historical overpayment currently sitting on their account) to pay off an active, open invoice.
- Workflow: Click Use on Account. The system pulls your designated credit balance out of the customer's profile and adds it directly to your active Distribute Balance, giving you the funds needed to select and pay off a new invoice row using standard methods.
4. Distribute to GL (Distribute to GL )
- When to use: When you need to post an entire remaining check balance directly to a corporate general ledger string rather than applying it against an open A/R customer asset account.
- Workflow: Click Distribute to GL. The system will prompt you for a specific General Ledger chart of accounts account string to absorb the value.
Next Steps in the Series
Once your check distribution balance hits 0.00 , click Exit to return to the Level 2 panel to enter your next check. Once your entire physical deposit batch is processed, proceed to the auditing and locking phase:
- Previous Step: DBD: Cash Receipts - Logging Payments & Customer Discovery (Level 2) Entering check amounts, logging metadata, and performing invoice lookups.
- Next Step: DBD: Cash Receipts - Journals, Auditing & Final Posting Running verification journals, modifying active entry files pre-update, and finalizing sub-ledger balance postings.